It took me some precious time to decide to play Gailardia 3. The developers have done very good job again.
Only the price of the game stopped me so far (I’ve not played Gailardia 2 yet, but Gailardia 1 was great)
So, what do you need to pass the third part of this excellent 8-bit RPG?
Again:
- Speak with everyone.
- Visit all sages.
- Read all books.
- Loot all dungeons and caves.
- Kill Lamia Demon King again.
Let’s begin.
Castle Raiton.
You emerge in front of the king in castle Raiton.
The game starts with small introduction.
- Apparently the current bunch of heroes are descendants of Rick from the first Gailardia game.
- And obviously Lamia Demon king has been revived again.
- You need to find why and take him (her?) down. Again.
After this, without much clarification the king sends you on your way.
(How the hell Rick has become a king?! He was always the first needing healing or revival.)
Talk with everyone in the castle and read all books to gather those tips and knowledge:
- You need to find the job-change work permits to advance your jobs.
- Make the Leader a really strong hero who can take a lot of beating such as fighter
- Have a Monk in the party. DEFINITELY!
- The magic swordsman is a Jack-of-all-trades.
Before you exit the castle, you need to choose jobs for your 4 heroes. (you can’t exit castle if you don’t choose)
My choice was:
- Alan – Warrior (very strong and sturdy, least agile)
- Chaz – Samurai (very agile, quite strong)
- Sammy – Monk (weak, can take some beating while healing the others)
- Lillis – Magician (very weak, but quick and with very good mass kill spells)
I totally neglected and abandoned the choice Magic swordsman, let’s hope I don’t miss something later. But it looks lame and weak from the description.
Next step is to walk around in Raiton castle and explore. There are 2 hidden things (wooden weapon and a herb) in the northwest part of the castle. And as all other cities in the game – 2 traders, Inn and Church.
Grab the 2 things, read the other 4 books with travel tips and get out to find action.
Hunt and level.
Kill 5-6 groups of monsters and you will be level 2. Kill 10 more groups of monsters and you will be level 3.
Get to know the vicinity of the castle and what groups of monsters are easy to train on. I suggest you train to levels 4-5 to feel some safety with the lower level monsters and then head south.
Side subquest (gem collection 1/7) can be done, by going east from the desert near the castle, but the monsters will be a bit strong for you at this moment. There is a sage 35-40 squares east from the castle. 3 chests – gem, wings and 40 gold. But leave it for better times. For now hunt around the castle Raiton.
|
|
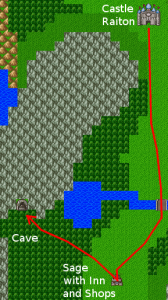
Main story quest proceeds South – There is a bridge and a small inn with a sage who tells you to keep south or to check nearby cave slightly to the northwest.
The cave to the northeast has 3 pots and 2 chests.
Leftmost pot has 80 gold and the chests have herb and spider silk.
Level 4 party can take the monsters inside the cave easily, so you may use it for training.
Feel free to train to level 5 in the cave, it’s quite easy and you will get some spare cash to upgrade the equipment to copper.
When fed with the first cave and the sage, keep going south.
You will reach 3 bridges and will glimpse another sage inside the mountain.
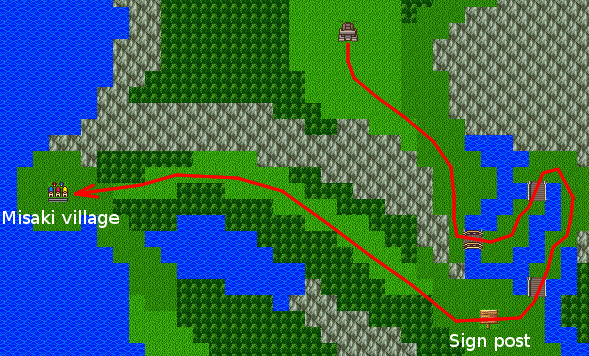
After the third bridge there is a sign post saying “go west” to Misaki village and don’t bother going to the shrine 10 squares south without the Silver key:
Misaki vilage.
It is actually a bit North-West from the sign. Beware the electric shell fish. They paralyze. To remove paralysis, either:
- Cast “Cure” (level 6 monk spell),
- use Paralweed or
- rest in an Inn.
This is learned by a book in the Inn. You will also learn, that Colma city is south and the silver key is in a cave … somewhere.
There is a pot in Misaki having some paralweed inside, so help yourself, but it is not that expensive.
How to use paralweed? You need at least one non-paralyzed hero to use the weed on you.
When to head south towards Colma?
- Gather some money.
- Buy best equipment in Misaki.
- Go back to the sage and check for the equipment suitable for monk and mage. (just to be sure)
- Get all your chars to level 7. (monsters are strong and there are sporadic shellfish attacks)
Go south. You are ready for Colma town.
You can’t get lost if you keep going south – you will reach Colma town in about 50 squares.
If accidentaly you get lost – drop me a message and I will draw a map.
Colma
Some stuff in Colma town:
- In the Inn you will find hidden Traveller’s wings.
- The sage of Colma knows where is the silver key.
- Colma has an adventurer’s shop. Check regularly. (you will find nothing here on the first visit)
- Colma armory will have new stuff for you, worth 2500 gold (if you bought everything so far).
When tired from gathering money for stuff or at least level 8, go east to the cave:
- Use the right-hand rule, the dungeon is not that hard.
- Level 1 is monsters only, good for training.
- Level 2 has some chests. South one has traveler’s wings or other useless junk.
- Level 3 has 110 gold, the silver key and a sign wanting you to revisit once the button is pressed.
The north corridor has 2 unpassable black squares, so go back to Colma. You can’t go north for now, because you need to find the switch that opens the path north.
In Colma, the silver key opens a room with 2 chests. Useless iron sword and Shell ring (+3 defense) inside.
Back to Misaki.
Now teleport to Misaki and head southeast to the sign saying you need silver key for the south cave.
Go south from the sign, the cave is 10 squares south.
Unlock and proceed east, you will emerge from the cellar of an Inn with a guard explaining about Calandora and the need for a detour.
Rest and go outside.
Only the elephants do heavy damage, so kill them quickly. Most of the other monsters you are already familiar with.
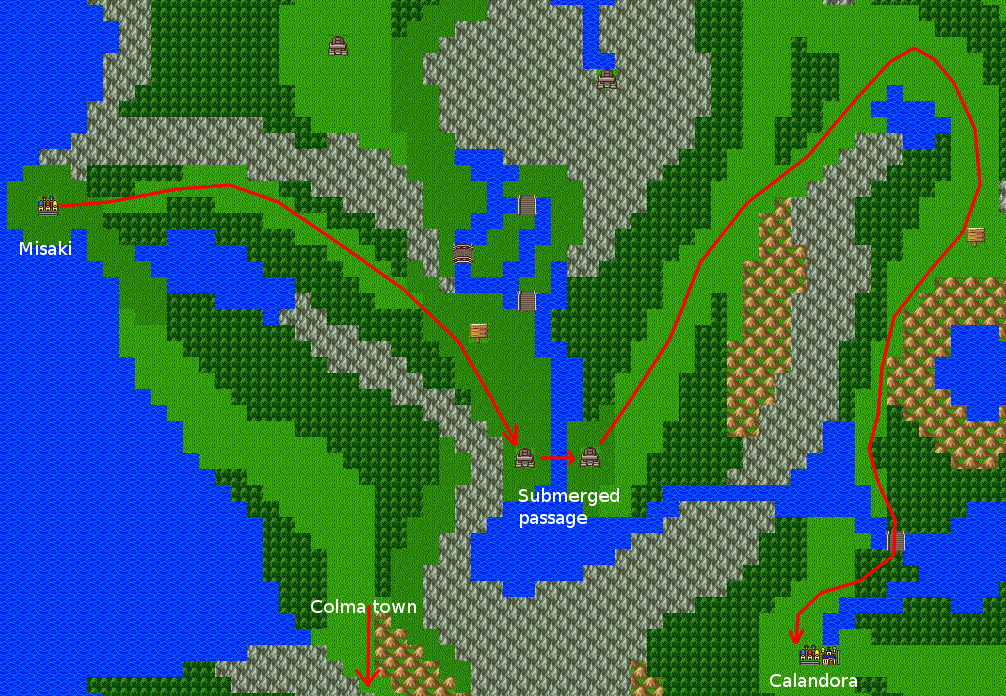
First go North and when the ridges end, turn eas and then south. Have a look at this map for guides:
After a short while and a dozen of battles, you will reach a sign beside a lake, saying Calandora is a bit more to the south.
It is actually 20 squares southwest from the sign, after a bridge.
Calandora town
…has few notable things:
- The gem collector wants 7 gems and promises reward. (you already know where the red gem is)
- There is a Cellar that needs the cell key to enter. (still not able)
- A soldier tells you you need a passport to reach the eastern continent. (First you need to find the underground passage).
- Local armory has two samurai specific items, which only samurai can use. Be sure to grab them.
- There are also toxic daggers which give more serious damage to mages and monks.
- Local shipyard are rivals to Port town shipyard.
- The shipyard never completed a single ship because … guess what … they need Aluminum ore.
- Aluminum ore can be found somewhere around … *cough* … guess where? That’s right -> Hamilton castle.
- Some useless things in the pots and barrels. You probably have enough herbs and wings already. The only new thing is a scented charm in one of the barrels in the shipyard.
Train to level 10, monk gets “Escape!“. Useful spell for a quick get-out-of-this-creepy-dungeon and mage gets “Mini quake” which does 30+ damage to all monsters in front of you. Very good for taking down large mixed groups of magic shellfish, fire beetles or sparks which breathe fire or cast “blizzard” on you.
Buy all stuff in offered by the armory. You will need approximately 5000 gold. Your samurai will become stronger than your fighter (for a while).
This is the moment when you can go east from Raiton castle to the sage, so you take the red gem (1/7). Here is the map:
When level 10-11, go southeast of Calandora. A small sign says Hamilton is east, but the bridge is broken, so you need to take the hard way.
Hard way is in the labyrinth south of the sign.
The way is barred by your first miniboss fight.
Should not be a problem for a level 10 party. The snake has about 200-250 life and your “Fire” spell does 60 damage. (blue is often associated with ice, so I think the snake hates fire). 3 turns max, and I wish you don’t get hit by breath too much.
As with all minibosses, the snake always hits 2 times per round.
2200 experience and 200 gold for defeating the blue snake.
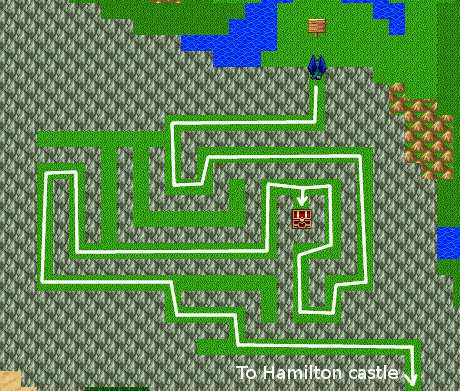
Now on to the “Maze”:
The chest in the labyrinth has a work permit.
Hamilton castle.
4 things for now:
- New stuff worth 5800 gold in the shop.
- Barking dog 😉 that is supposed to bark at you when he learns something.
- There is a sentry in the northwest corner of the castle, blocking the way down.
- You need to speak to the king if you want to pass.
The king is laconic and gives you the ore without much asking.
When you grab the ore, feel free to return to the shipyard or train a bit to gather money for new equipment. 5800 gold are easy to gather and more experience always pays in time.
Back to Calandora.
The shipbuilders need some time to complete, so go hunt money to buy all stuff from Hamilton and train a bit.
After your return, the builder says you need blueprints and you are more reliable than the shipyard owner.
Speak with owner again.
He sends you to Port town via the underground passage (you need passport).
Talk to him AGAIN and you will get the passport.
To Port town.
This is a bit of a walk, and you better be rested and have best equipment.
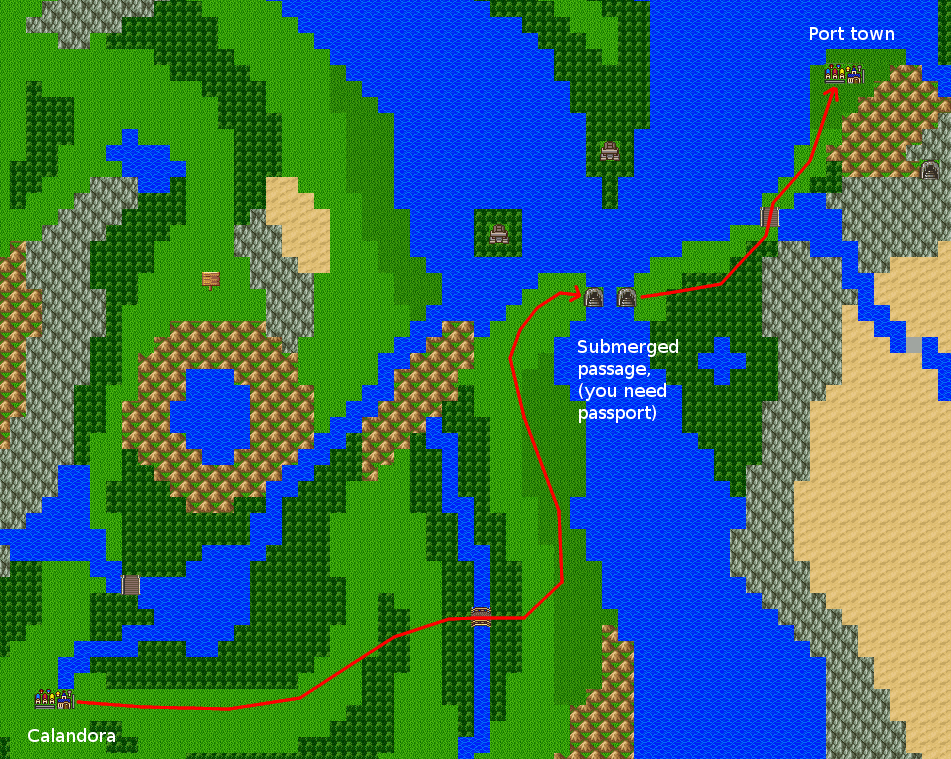
Head east from Calandora until you reach the shore and then a bit north.
Enter the passage. The guard will step aside. (If not – you did not speak with the shipbuilder 2 times)
Get the maze to the end. Level 11-12 party should do well. Only blue sparks and occasional huge spider are a threat, but you can heal 100 damage already.
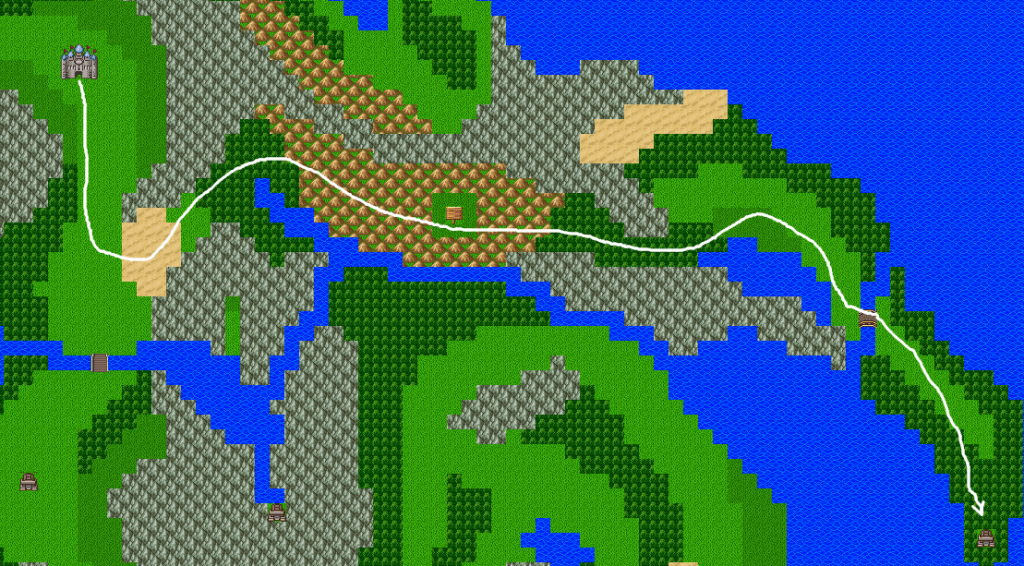
After you reemerge go northeast over the bridge and you will see Port town. Here’s the complete walk:
Port town.
- You will learn about 12-th level monk’s “Full heal” spell and how it can’t be used in battle. Still very useful between battles and only 12 SP.
- Armor shop has new stuff worth 10000 gold.
- Everyone is scared from the monster.
- Port town ALSO does not produce ships, regardless they have the tech.
- Shipbuilding master WILL give you blueprints if you defeat the monster in the southern cave.
But this walkthrough is getting too long, and I will continue in part II.
