m0rd0r

Jan 122012
 

G.8032 is an Ethernet switching protocol, also known as ERPS or R-APS. It basically does just one thing – allows easy ring topology without traffic loops.

R-APS is built on existing CFM monitored VLAN, that is used as a control VLAN. Management traffic over this VLAN can be sent everywhere and it is R-APS stack responsibility to manage the control traffic over this VLAN, so traffic loops don’t happen. The same CFM configuration can still be used for monitoring and control (Sending loopback, link-trace and issuing SAA tests between switches).

There are few terms that need to be understood, before we continue:

  • CFM level on which G.8032 ring is built. Needs to be one and the same CFM Domain everywhere (same level, same domain name, same maintenance association name, same VLAN).
  • Control VLAN is the same VLAN monitored by the CFM domain.
  • Monitored VLAN(s) are a group of VLAN(s) that will be used in the ring for user traffic.
  • Ring ID is the unique identification of the ring. It is also embedded in the R-APS control frame sent between units.
  • Node Role is the role of any specific switch or router in the ring. They are either [Simple, RPL owner, RPL neighbor or Interconnection] node.
  • Timers are meant to protect the ring from connection flapping and have nothing to do with performance.
  • RPL stands for Ring Protection Link and is the link between RPL nodes, that is normally NOT allowing traffic to pass.
  • Subring is a ring attached to an existing Ring, and using the same CFM level and configuration as the main ring.
G.8032

A R-APS ring with a Subring and 3 customers.

Having a look at the diagram, we can tell that this is one main ring, with one subring and 3 users attached to various parts of the 2 rings.

R-APS Cons

  • The protocol is suitable for rings only. Layer 2 mesh and star topologies are covered by other switching protocols, such as MSTP or RSTP.
  • Optimal ring nodes in a ring is 4 (it is tested with up to 8 units, but the convergence timing suffers)
  • Ladder type networks are possible (More rings, attached to each-other) but the topology changes propagation takes time to reach  end rings and traffic loss is possible in large networks.
  • Ring convergence (switching on demand or failure) is as good as the CCM hello interval used in the CFM configuration.
  • It needs detailed Layer 2 CFM knowledge to build it on.
  • Needs re-configuration of 2 ring nodes when adding another node in existing ring.
  • Not always giving end-users the most optimal routes (user1 and user2 in the diagram above will have their traffic go sw6<->sw3<->sw2<->sw5<->sw4)

R-APS Pros

  • Much easier to understand than xSTP and MPLS.
  • Neat looking in a diagram. Less cables and connections to follow.
  • Easy to add more rings to existing ring.
  • In a good setup, convergence is <50 ms.
  • Once built, the existing CFM configuration can be used to issue loopback, linktrace and SAA tests to check for delays, traffic bottlenecks and possible problems.
  • Monitoring and control is much better than in xSTP or  MPLS (CFM can be added there too, but not by default).

R-APS Node Roles

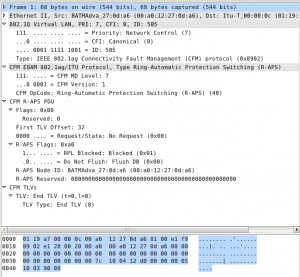
Captured R-APS frame in Wireshark

Captured R-APS frame in Wireshark

  1. Simple node is the node, that is simply connected to 2 other nodes. They are either other simple nodes or RPL nodes.
  2. Interconnection node is a node, that is connected to 3 other nodes. Interconnection nodes connect one ring to a subring. Interconnection nodes are very often connected to RPL nodes, but not always (depending on ring size).
  3. RPL-Owner node is the node that owns the RPL link. The RPL owner role in the ring is to send control R-APS packets towards the other nodes. R-APS packets are having few important parameters (see dissection in the picture). If you are interested in the packet itself, feel free to download and examine. The most important are the R-APS state and the request.
  4. RPL-Neighbor has almost the same function as the owner. It holds control over the other ring port that is part of the RPL link. Normally RPL-Neighbor holds this port blocked for all traffic except CFM on the same level and reacts to R-APS control frames with unblocking or blocking this port.

All nodes are passing CFM and R-APS frames to the next node through the ring link. If the node is an Interconnection node, it sends the R-APS packets only to the node in the main ring and blocks all subring R-APS frames, so they don’t loop the main ring.

Interconnection R-APS node

Interconnection R-APS node

CFM Configuration.

It is a good practice to plan the CFM configuration in advance.

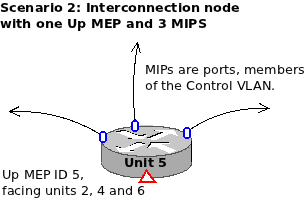
You may either stick with Down or Up MEPs (or both). Easier and more quick for configuration is to use Up MEPs, because you only set one MEP per unit.

In this case, the CFM MIP creation policy must be set to allow MIP creation for all members of the Control VLAN chosen for the R-APS ring – Otherwise the CFM connectivity will not be established.

But using Down MEPs is the most common practice.

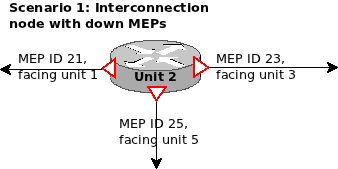
You set a ring port to be also Down MEP facing the neighbor unit. This way the CFM connectivity is established by pairs of MEPs facing each other.

This setup type is of course a bit more time consuming and harder to understand than using Up MEPs.

In our QA practice, we use numbering like MEP 21 (Switch 2 to Switch 1) or MEP 23 (Switch 2 to Switch 3) for easier mapping of the pairs, and we still make mistakes after months of practice (See Scenario 1 diagram).

R-APS node with one Up MEP and 3 MIPs

R-APS node with one Up MEP and 3 MIPs

There are also some Pros and Cons about the Up MEPs.

Easiness is one of the good parts, and you can also use the much more open visibility between all MEPs to issue Linktrace and Loopback tests between units. (All Up MEPs will see all other Up MEPs)

With this setup you can find bugs in the network or bottlenecks in the route between random 2 switches.

In the same time, using a very rapid Hello Interval with Up MEPs (e.g. 3.3 ms) can have a heavy impact over the Switch CPU utilization, because you need to work with 300 CCMs per second per remote MEP. And this is quite a lot CPU overhead for bigger ladder networks. (6 Up MEPS generate total of 1800 packets per second, heard by all 6 switches in the 2 rings diagram above).

It is up to you to decide if you stick with Up or Down MEPs when building a G.8032 Ring network. Just plan ahead and plan smart. An example CFM configuration will look like this:

oam
 cfm
  domain d1
   level 1
   ma ma1
    vlan           1000
    hello-interval 300Hz
    mep 21
     bind-to     1/1/1
     no shutdown
     ccm-enabled
     exit
    !
    mep 23
     bind-to     1/2/1
     no shutdown
     ccm-enabled
     exit
    !
    mep 25
     bind-to     1/3/1
     no shutdown
     ccm-enabled
     exit
    !
    exit
   !
   exit
  !
 !
!

It is not really something complicated, once you get used to CFM. And it is also set-and-forget type of configuration. You don’t need to touch anything if the network topology is not changed.

For a normal setup with Down MEPs, it takes a bit of planning and charting, so you don’t get lost. You need to know all MEP pairs between ring ports in advance, so you better chart a bit. I use a neat useful Linux software called Dia (Diagram editor) which saves me tons of head scratching 😉 (actually most of my tech blog stuff is made with Dia).

When you set all units the way you planned, you need to see stable CFM connectivity on all MEPs in all Ring nodes. (except one intentionally broken link, so you avoid L2 traffic loops). If you don’t have CFM connectivity, the ring (of course) will not work.

The setting of the ring itself, when you already know what MEP is facing which MEP is quite trivial. Here is how a Telco Systems 7124s switch configuration looks like:

ethernet
 ring-aps
  instance 1
   role                  rpl-owner
   control-vlan          1000
   monitor-vlan 1
   monitor-vlan 2000
   cfm-domain-level      1
   wait-to-restore-timer 1
   port 0
    port-id  1/1/1
    mep      12
    rpl-port
   !
   port 1
    port-id 1/2/1
    mep     52
   !
   no shutdown
   subring 2
    control-vlan               1000
    subring-port 1/3/1
     mep 62
    !
    ring-id                    2
    virtual-channel-vlan       2000
    wait-to-restore-timer      1
    propagate-topology-changes
    no shutdown
   !
  !
 !
!

Very important: When you build L2 rings with MSTP or R-APS, build them with one of the ring links intentionally broken.

When all your RING units are set and enabled, restore the link connection.

This way you will not make a traffic loop with control packets before the ring is operational.

If you set everything okay in this example, you will have CFM connectivity on level 1 with 3 local MEPs connected to 3 remote MEPs. R-APS needs about 1 minute (with the example setup) to initialize and get Up.

And the result will look like this:

===============================================================================
RING APS Detailed Information
===============================================================================
------------------------------------------------------------------------------
Ring 1 Instance 1 Role rpl-owner
------------------------------------------------------------------------------
Admin State - Up                Oper State       - Up
RAPS State  - Pending           Top Priority cmd - N/A
Control VLAN- 1000              Revertive Mode   - Enabled
Hold-off timer (msec)- 0        Wait-to-restore timer (min)- 1
Guard timer (msec)- 500         Wait-to-block timer (msec)- 5500
Monitored VLANs- 1,2000

Port 0 - 1/1/1
    Role         - RPL                Status - Up
    Peer Node ID - 00:01:6C:27:4B:BA  Peer Mep - 12
    Peer Command - N/A                Peer Info -
Port 1 - 1/2/1
    Role         - Regular            Status - Up
    Peer Node ID - 00:01:6C:27:4B:BA  Peer Mep - 52
    Peer Command - N/A                Peer Info -
-----------------------------------------------------------------------------
Ring 2 SubRing 2 Role simple-node
-----------------------------------------------------------------------------
Admin State - Up                Oper State       - Up
RAPS State  - Pending           Top Priority cmd - N/A
Control VLAN- 1000              Revertive Mode   - Enabled
Hold-off timer (msec)- 0        Wait-to-restore timer (min)- 1
Guard timer (msec)- 500         Wait-to-block timer (msec)- 5500
Virtual Channel VLAN - 2000
Propagate Topology Changes - Yes

Port - 1/3/1
    Role         - Regular            Status - Up
    Peer Node ID - 00:06:4F:29:49:F0  Peer Mep - 62
    Peer Command - N/A                Peer Info -
Virtual Channel
    Peer Node ID - 00:01:6C:E2:FF:D2
    Peer Command - N/A                Peer Info -
===============================================================================

Troubleshoot R-APS

It happens to make errors in configuration. Sometimes even good planning leads to something missed. This is quick Q&A to check, in case you don’t have the results you want:

  1. Do you have CFM connectivity between all your ring nodes?
  2. Did you set all CFM domains and associations with the same parameters? (names, level, VLAN)
  3. Did you set all Ring nodes working on the same CFM level?
  4. Did you set the remote MEP IDs expected on port 0 and 1 exactly as planned? (very common mistake)
  5. Is your Control VLAN set the same everywhere? (Same as CFM MA configuraion)
  6. Are your node roles set correctly? (One RPL-O, one RPL-N, few simple nodes)
  7. Did you set the RPL ports exactly between owner and neighbor nodes?
  8. Is your RingID same on all members of the ring?
  9. Is the subring RingID different than main ring RingID?
  10. Do you monitor all VLANs involved in sending traffic in all ring nodes? (Missed monitored VLAN on any node does not get stopped on ring ports and leads to L2 traffic loop)
  11. Do you monitor the default VLAN? (easiest L2 traffic loop is management traffic sent on the default VLAN such as SNMP or telnet)
  12. Do you send management traffic over the Control VLAN different than CFM traffic?
  13. Are your timers the same on all ring nodes?
  14. Did you forget to enable any Ring node? R-APS gets established (state: Up) and blocks user traffic, only when it is working (administratively Up).
  15. Are your ring ports Up? (you may forget to wire them sometimes. It happens. Don’t worry.)

If you answer any of the questions above with “Yes” – then you probably have broken ring or massive traffic loop. Check port status and  statistics. Without user traffic, you should see only the CCMs flowing between ring ports (600 p/s in the CFM configuration above). Recheck if the CFM connectivity is okay everywhere. R-APS depends solely on well working CFM.

Test R-APS

When everything is set, you may check some simple tests to see if the rings are working fine.

  • Execute Linktrace between Site1 and User1. You should see the linktrace pass sw1 -> sw2 -> sw3 -> sw6.
  • Execute Linktrace between Site1 and User2. You should see the linktrace pass sw1 -> sw2 -> sw5 -> sw4.
  • Break the link between sw2 and sw5.
  • Execute Linktrace between Site1 and User2. You should see the linktrace pass sw1 -> sw4.
  • Break the link between sw2 and sw3.
  • Execute Linktrace between Site1 and User1. You should see the linktrace pass sw1 -> sw4 -> sw5 -> sw6.
  • No traffic should be lost while you do the link breaking tests. R-APS will enable the RPL links in less than 50 milliseconds. Normal user traffic must not feel it at all.

If all of the above is checked to work – then CONGRATULATIONS! You’ve just made your first working pair of Rings.

 Posted by at 11:53 am
Jan 012012
 

Demon hunter walkthrough and maps

This part of the walkthrough is after you complete “Arbenus Feather” quest. If you are not yet there, DON’T spoil your game story but refer to previous parts of the walkthrough:

Part 1 – About Kamael and Dubaq

Part 2 – About Inferno

Part 3 – About Stigia and Cave of Darkness

Part 4 – About Gehena

Part 5 – About Distia

Part 6 – About Marlborose and Makerusia

Part 7 – About Arbenus

Next stage is Minauros where you have to find “Minauros’ feather”. Go west to Stigia, keep going until you reach Forest of Evil-2.

The beginning of the Minauros is a dark forest, quite brutal for Slashers. Lots of poisoning and stunning.  Then it goes to a desert, that is quite good for slashing. To reach the desert, you need to use 2 switches to open the door in Shadow of Death-5. The switches are in Shadow of Death-3 and Forest of Watcher-5.

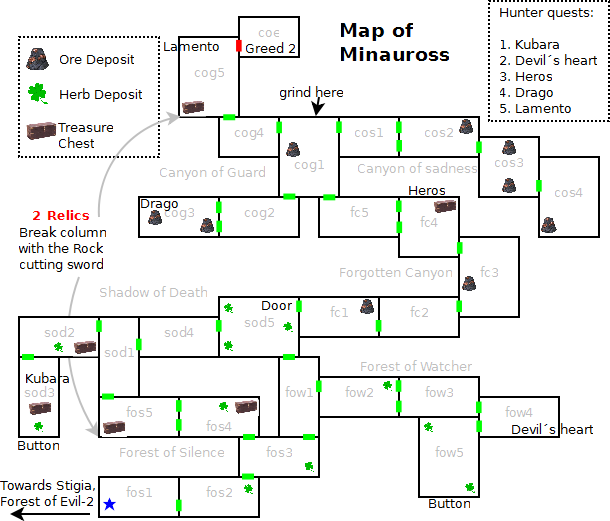
Map of Minauross

Map of Minauross

There are 2 Relics in Minauross:

  1. Forest of Silence-5 (SW part needs rock cutting sword). 10/12.
  2. Another in Canyon of Guard-5 (SW) 11/12. Beware the chain ball.

With this, you are almost done with the relic quest if you followed the walkthroughs so far. The last Relic is in the Tower.

MORE Grinding ;(

1 lousy quest in the whole map – “Perfect bribe” find 20 rare hornet nest drops in Minauros forest area. Best map is Forest of Silence-2. 5000 xp and 2400 gold.

The whole Minauross area is also not good for questing, as it was with Arbenus. Grind your level as near as Greed’s. He is level 65 now. I found that the quickest monsters are the local Muttons. They fall with 3-4 slashes.  Canyon of Guard-1 has 8 muttons, but needs lots of jumping to collect them in one place.

When ready, go up to the Canyon of End and charge Greed. He will use the same 4 attacks as before but will have (LOT more HP). Buy the best potions you can afford and fight. VERY slow battle, avoid his hits when possible. Maybe this is the moment to start investing in purple potions. 20 at least (140 000 gold).

If you remember the tactics you used in the previous fight with him, there is no need to explain them again. Takes above 10 minutes of heavy bashing until he falls to his knees. This is the moment when you must jump AWAY. He will charge with 7000+ hp hit on you and probably kill you if you are in his way. Jump away and keep charging until he falls, 5200 xp and Minauross feather

Hunter level Needed points
Level 1 3000
Level 2 6000
Level 3 10500
Level 4 16000
Level 5 22500
Level 6 30000
Level 7 38500
Level 8 48000
Level 9 58000
Level 10 70000

… now comes the quick run part. “Escape” is 15 minutes timed quest to reach Talagaron base. Gives 4600 xp and 200 gold. You CAN’T save and CAN’T use teleport scroll. Absolutely stupid and rude after you finished Greed ;( What if your phone crashes or some !d!ot calls you while doing this timed quest!? Lot can happen in 15 minutes.

When you are done reaching Talagaron – wipe the sweat from your forehead with shaky hand. You will have to go to the tower everyone is speaking about – at last. Emil opens the “Tower of punishment” map and gives the quest “Battle“. You need to kill Elen (Will continue in the next part of the walkthrough, when I complete this map). Now is a good time to

Get hunter level to max!

While you grind, try to get all the hunter quests for hunter points. After level 60, you may start investing your hunter points with Reona in the base of Talagaron for equipment. Level 60 equipment costs around 3000 hunter points, and by finishing all hunter quests in Minauross map, you will get 3700 hunter points. This is where I have collected 70000 hunter points total and got to the maximum hunter level 10 in the game… this – I am sorry to say DID not open any more hunter quests or other subquests in this or previous areas.

So, take your time grinding, collecting hunter points and investing them in random equipment bought from Reona in the Talagaron base. She does not always give good stuff, but occasionally I get some purple or orange (rare and set) items, that are worth 400k gold in the online game market. (You need stable internet connection to trade or the game crashes and restarts). 3 times in row I got only ordinary (white) stuff, that costs nothing (well – 1000 gold to sell to NPC). It’s up to you to decide if you will take my advice. You may get 60-th level rare or set sword with 5-10% chance. Try your luck, hunter points can be taken from hunter quests or by exchanging drops. 100 Mutton drops will give you 2700 hunter points. Almost 1 sword 😉

You may of course start exchanging hunter points for items at early level. Lowest level stuff that Reona sells is level 20… but I definitely think, it’s easier to find lower level drops or use recipes to make them. In worst case – give 50000 gold in the market for better sword to someone that found it.

Check the market often, the good stuff disappears quickly. And go to the next map – Tower of Sin 🙂

Target Description/place Hunter points Gold
Death of Kubara Kubara @ Shadow of death-3 740 780
Devil’s nest Devil’s heart @ Forest of watcher-4 740 780
Heros the wizard Heros @ Forgotten canyon- 740 780
Drago Drago @ Canyon of guard-3 740 780
Shadow of darkness Lamento @ Canyon of guard-5 740 780
Devil Within Illusion Greed @ Canyon of End 1040 1380
Totals 4740 5280
 Posted by at 1:30 pm

How to install WordPress in Windows.

 Netw0rking  Comments Off on How to install WordPress in Windows.
Dec 172011
 

If you are reading this, then I suppose, you are not a fan of Linux, BSD or MacOS. I wrote a WordPress for Linux installation few months ago, but still friends are asking me “What about Us? We don’t use your strange OS with text mode only! Bleh!”

So I’ve decided to help them too. There are few things you will need to do the installation:

  1. Install XAMPP or other windows web server.
  2. Install WordPress.
  3. Configure MySQL
  4. Configure WordPress to use your web server and database.
  5. Write your own first post 😉

How to Install XAMPP

First you need to download XAMPP. Go to their site, download either the archives or the installer and follow their installation instructions. They are quite easy to follow even for non-techies. Next-next-finish. You may like other web servers, but I really suggest this one for the easy installation. It is packed with everything you are going to need for a WordPress clean install.

Read carefully All security measures and precautions in the site. Some of the important passwords are left :blank: by default. You don’t want this!

Launch a browser and enter “localhost” in the address field (without quotes). Choose your preferred language. It will be for the interface only. Have some few minutes to get to know the interface. It is friendly. The only Bug I’ve seen in the installation is – the PHPMyAdmin is set in German by default. If you are quick to go there before setting a password – you will  see German interface. To change this. Click on the tab “localhost” above and in “Anzeige-Einstellungen” choose [Sprache – Language] to be English. If you set PhPMyAdmin with password – the login screen will have language selector.

To change default passwords (blank) for the users, you need to choose [Security] from the left menu. There you will see a link sending you to http://localhost/security/xamppsecurity.php. Go there and enter passwords for MySQL root user. The other user and password will protect your local server directory from free access. Don’t forget those passwords and always use GOOD passwords (as in the end of this article for security I wrote).

Go to XAMPP control panel and click [Stop -> Start] on the MySQL server for the new password to take effect. REMEMBER the PhpMyAdmin password.

You are set for now. Now launch another tab/window in the browser and enter http://localhost/index.html in the address field. You are supposed to see the caption “It works!”. If it does not – review the steps so far. You are missing something.

XAMPP is set. Now we need to

Install WordPress

For the purpose of this “How to” – I will be using latest WordPress .org. It is freely downloadable at http://wordpress.org/download/

Get the file and unzip it in a handy folder. Then move the WordPress contents to the “htdocs”, where you installed the XAMPP. It will look like this:

Path to htdocs, where to put WordPress

Now the things will become a little bit complicated. You need to know how to edit a .php file with some important data inside. By going to https://127.0.0.1/wordpress/, WordPress installation will reply with:

There doesn’t seem to be a wp-config.php file. I need this before we can get started.

Need more help? We got it.

You can create a wp-config.php file through a web interface, but this doesn’t work for all server setups. The safest way is to manually create the file.

Create a Configuration File

You can either click the links and follow instructions or open the sample file and edit it by hand. The file is in X:/xampp/htdocs/wordpress/wp-config-sample.php

Rename the file to wp-config.php and open it in Notepad or other editor, that does NOT put formatting and fonts/sizes/symbols/eyecandies and other useless tags. (Have in mind, that some windows installations will rename the file like this -> wp-config.php.txt when you use “Save-as” in Notepad. The extension must be .php and not .php.txt. Change it accordingly!!! Go to your htdocs/wordpress directory and execute “rename wp-config.php.txt wp-config.php”) There are few lines, that are important in this file:

define('DB_NAME', 'database_name_here');
define('DB_USER', 'username_here');
define('DB_PASSWORD', 'password_here');
define('DB_HOST', 'localhost');

To fill them, we need first to set them in MySQL data base, that will be holding our WordPress articles and pages. Go to the MySQL installation at https://127.0.0.1/phpmyadmin/ and enter your root user and password, that you set earlier and I told you to remember. All important settings are to be done from this admin page before the Blog is set.

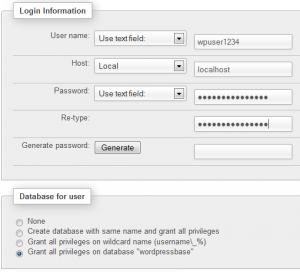
  1. Go to Databases tab and enter new data base name. “wordpress”, “wordpressbase”,  or “blogdatabase” are all good names. Click “Create”. PhpMyAdmin will reply that the database is created.
  2. Now hover on “More” tab and choose “Privileges” -> “Add a new user” and set a name.
  3. Choose Localhost for a server
  4. Choose a complex password, that is not easy to guess. This user will have all access to your articles and can destroy and create tables in your database.  If unsure WHAT is a complex password -> reread the end lines of this article or create one with “Generate” button. In the last case, it will be a gibberish-ungueassable-very-strong-password, that will be very hard to guess by a malicious software or bad friends.
  5. Grant all privileges to our new user for table “wordpressbase” or whatever name you have used in step 1.
  6. Click “Go”.

The data above is important. Needs to be remembered and not written on a paper or a file that will fall in malevolent hands or scripts.

WordPress configuration

is the next step.

Edit the file X:/path/to/xampp/htdocs/wordpress/wp-config.php and enter the data in the config lines I pointed as important, until they look like this:

define('DB_NAME', 'wordpressbase');
define('DB_USER', 'wpuser1234');
define('DB_PASSWORD', '0neExtremelyL0ngBadPassw0rd');
define('DB_HOST', 'localhost');

Mind the bold text. It is only an example and your server may be set to something else. The password is long enough and has digits and caps. SAVE the file and go back to the link https://127.0.0.1/wordpress

This time, it will not reply you are lacking the file wp-config.php but will show the setup screen with the data needed for installation of the blog itself:

  1. Setup the blog

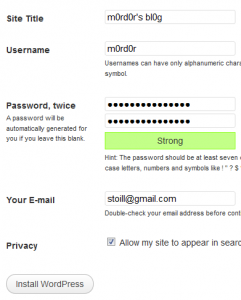
    Site title. Choose whatever suits you. This will be shown in search engines and as a header above all articles. If you enter “Johny’s blog” and you write article “How to ride a bike”, for the search engine results, your article will be shown as “How to ride a bike >> Johny’s blog”. This values can be changed later, so don’t think too much.

  2. Your user name. Not “root”, not “wpuser1234”, not some nonsense -> something artistic or your real name. This username will be shown below/above all articles you write (depending on theme). All your comments will be show also with this user name. Choose wisely, because this is your MAIN and Almighty user, that can set everything else in your blog. Giving rights to other users, deleting spam, moderating articles and user comments.
  3. Good password. Very important. See step 2.
  4. Your e-mail. It will be used to contact you in case someone needs it. Can be shown or hidden. There are plugins that will send you e-mail and user input without the need to show your e-mail at all.
  5. Click “Install WordPress”. Wait a bit. Ready ;). WordPress will tell you how disappointed they are, that this install is not more complex 😀 and then allow you to enter the Admin page of your new blog.
  6. Have a good look in your Dashboard. This is where ALL happens. If already bored to death, click on the upper left corner, where the name of your blog is and click “Visit site”. There is your first blog post saying “Hello world”.  Go back to the dashboard from the [Right bottom blog menu -> Meta -> Site admin].
  7. Your blog is ready. There are few more steps to set, but they will depend on your own installation.

The next steps are strictly depending on your preferences, the domain name you bought, the theme you have chosen to use and the style of your blog.

You need to decide them yourself, and most of them are covered ELSEWHERE. The most important are:

  • Dashboard -> Settings -> General. Choose your site name, title, full path to your WP installation, data and hour format for article posts.
  • Dashboard -> Settings -> Privacy. Set if your new blog should be indexed by search engines or you are going to advertise it yourself.
  • Dashboard -> Settings -> Permalinks. This is important for Search Engine Optimization. Most of the bloggers advice to choose the “Post name” format instead of “Default”.

Again. It is up to you when choosing those settings.

Write your own first post

Ready 🙂 ?!

Go to Dashboard -> Posts -> Add new.

There will be a small dialog with Rich Text Editor inside. Take your time. It’s like opening a document in WordPad. When you decide what to write – get to work. I’ve thought it will be easy, but it took me almost 1 year of experience until I learnt how to write my own articles in my own way.

Few advices:

  1. Don’t copy&paste articles from Internet.
  2. Think about what you write. Content is the main and most important thing in your new blog.
  3. Read articles about blogging. There are 4 main article types. Personal, how to, news and reviews. First, take almost no traffic, How-to’s get good traffic, news get traffic when they are current and reviews are good as long as the article is relevant and new. It is up to you to decide, but believe me – there are TOO MANY personal blogs. I read some of them, but their count is in digits. Stick with the other 3 categories. I know a person that has 5 digits per year in passive income just by writing reviews for a photo materials and tools.
  4. Don’t use black hat techniques to promote your blog. It takes time to build authority and get backlinks. It is not an overnight job.
  5. Decide if you are going to monetize your blog. This can be very frustrating but interesting process. Don’t expect “Big money” until you reach at least 1000 visits per day. According to WikiPedia and math statistics -> Conversion goes between 3 and 10 AD clicks on 1000 visits. Don’t expect miracles. Especially if someone told you, that you will get $200 per day from blogging… you may get there … eventually… after some 2-3 years of work. There are no shortcuts. Using forbidden tricks will only get your blog blacklisted and your AD account blocked with all your revenues held. Believe me. You can’t. And if someone promises you to get rich overnight – block him and report him. It’s a scam.

Good luck and welcome to our online family.

 Posted by at 2:08 pm