What does it take, to finish the game?
First of all – patience.
Second. Speak with everyone in the cities.
Then, some knowledge of the surroundings.
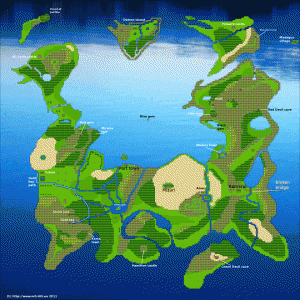
I’ve googled for a decent Gailardia map. Did not find any at all and took the matters in my own hands… created one. Feel free to download It to your phone and use it for guidance in the beginning. Later, an ingame map will be available to you, but not until you reach levels 10-12.To get to the walkthrough…
Your first task is to reach Port town alive. You are still too weak to go there directly, so a small detour will be okay. There are small quantities of weak monsters on the way as Slimes, slugs and bats.
Be sure to visit all the sages in the way. First one of them is near St. Louis castle. A little bit to the east. He suggests you need a ship. But Port town is still a bit far for now.
Let’s first reach the city of Colma with It’s dungeon (or Colma cave, whatever) grind a bit of experience and loot the two chests there. They will not have lot, but we will do this for sport and profit. One of the chests holds red jewel. This item does nothing and costs nothing but is important for endgame collection percentage. It is not much but it is very important to train our 3 chars in every possible dungeon. Guile will take ahead faster, than Rick and least XP will go to Alice. She is slowest to level but her spells will make you really strong in time, so take your time to make some kills.
Now we go to east. There is a small town called Port. There we understand that a ship can be built only with very light metal called Alum(inum). The nearest Alum mine is beside the desert town Mizuri northeast of the Hamilton Castle. Mizuri too hard to reach for now because of the desert Brains, Scorpions and Sandworms, so we better go towards Hamilton.
The reason to come to Hamilton is because its king is the one that can unlock the mine. We listen to his weepy story and go to the mine. There is a king’s guard refusing to let us in, so we get back to the king and ask for permission. It’s granted and we can enter the mine. Some pointless walk IMHO. But the XP on the way will pay later.
Edit @ 21.10.2011: (Additional info from Barbed_Oracle) If the King does not mention the soldier at all, maybe you forgot to visit the Sage west of Hamilton. (it is in a forest, on the way to Hamilton, but you may have missed it).
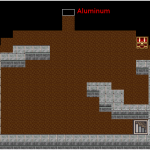
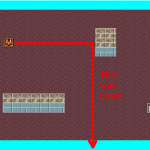
We go all the way back. The soldier lets us in now. It is a 3 floors “mine”, again – looking much more like a dungeon. Some 3 chests with stuff and the ore is in secret square on the deepest floor. All of this – not that important. The most important thing here is the elusive SILVER BELL. This monster hits hard with Mini quake, can’t be hit easily and runs away in the middle of the battle. But… has only 3 HP and if you manage to kill it, the experience is 5550 points. Quite worth your tries. The other good monster is the Gold bell. This one is easier and gives 400 gold. When you are fed with stalking the bells, go to the third floor and grab the ore. It is in the little dark area north, where is a small dead-end path. Just advance another step north in the black square and press the action button.
Back to port town. Alice should already have Teleport, so feel free to abuse this nice spell fully, but don’t forget that making the kills while walking is also important.
While the shipbuilder completes the ship, we need to go to Mizuri town to get the world map of Gailardia. The way will be filled with centipedes, brains and sand worms. Arm yourself with patience. Start from Hamilton and teleport back to the city as many times as you grow low on healing abilities to recover in the Inn. Once in Mizuri, grab the map and start using it when lost. It is a bit ugly, but It works fine and is handy. If not, use my Gailardia map instead. The built-in map does not have town names ;).
All visited places should blink, and X will mark your group on the map. While you go get the map, the ship is completed, you go back to the Port city and take it. From this moment on, you have much more freedom to explore the world. There is small island with sage just a bit north. Go and speak. If you have been in Romario town already, go there again. The bridge is rebuilt just after you get the map and the ship. Easy area with a sage southeast from the bridge and another quite hard to reach cave north of Romario town. This is where the Red devil resides. He has 400 life, so if you are not 100% sure you can take him, don’t go there just yet. I suggest you are level 18-20 when you go there. He is the easiest Demon King subordinate but still hits very hard.
I suppose you’re gonna need to get above level 15 to venture deep in the sea because of all the sea monsters, but if you feel strong enough – go east from port town, until you reach the port of Albama. There are stronger weapons and armors (a bit expensive too). North of Albama town is a tower with monsters. The Super mages cast Blizzard (ouch!) and the Third-stones hit for 20+ hit points, so be prepared. The tower holds the Black gem in a chest on the top floor.
The blue gem is located on a tiny island in the center of the map. Reachable with ship only. And the green gem is in the slightly different swamp square on the island where all rivers meet. Reachable by entering Port town’s river mouth.
At level 16 Alice gets Revive! This spell will be a life saver. Guile also gets the spell on level 19, and Rick on level 22, so you will have double backup in the wilderness. The cost to revive in town however is not too high and it gives you full HP/SP.
The golden key is needed to open the path to Elizabeth town. There is short water way to there from Colma city (see my Gailardia map). Three floor dungeon with cold breathing ghosts, zombies and evil lamps. The chest on the third floor holds the gold key.
This key opens also some other doors. In Louis castle there is a sage that tells you to get to explore top-right grave stone. This stone is in the graveyard of Madagus island town. Have the stone used with the action button from its right. You get the truth stone that casts down illusions!
The cell key is a bit of a stroll. First you need to get to Elisa town, but the bridge is broken. It’s accessible only through a line of caves, the caves have gold door, so you need golden key first. North of Elisa town is a small lake and right of the lake in the forest is a small swamp square. It is actually an entrance to a small room with Hagil inside. Speak with him. He is tired and going to the city to rest. Now all the way back to the soldier beside the broken bridge. The bridge is fixed and he calls YOU Hagil 🙂 The cell key is probably for him but you received it. All of this is not told by any of the sages in the EN version of the game. Not a single tip. That’s why the walkthrough forum is filled with so much questions about it.
Receiving the cell key will open some doors. In Alabama there is a room with a man claiming he knows a secret. The secret is on the top floor of nearby tower. The hero helm. The explanation is a bit unclear. The real way is to stand by the chest from its right. Go to the right until you “hit the wall” and then go south until you fall from the tower. There is the secret room.
The hero shield is in a tower south of Colma, reachable only by ship (crossing a river). It also needs the Cell key. The tower itself is a labyrinth of rooms and stairs. There are 4 chests inside.
The white gem is accessible if you have both golden and cell key. It is in the middle cell of Howard castle’s jail.
The Blue devil is also accessible once you have the Cell key. He has 1000 HP, it takes a while to kill him and you will probably lose Rick and Alice while fighting. Just don’t forget to revive them, but use Guile only for fighting. You should be at least level 23-24 to try to kill him. The right sequence is Guile hits, Rick casts Bless barrier to all, Alice casts high tension for Guile so he almost doubles hits. With Bless barrier devil’s breath does only 20-30 HP and you will survive. If Alice is still alive in turn 3 – Cast mega Fire. Blue devil can’t endure it. If Rick falls – get him back and let him heal. Try to high tension him too. The devil should be down in 5-6 turns or you will be :p
If you haven’t already – go finish the Green devil. Big island, east of Hamilton castle. He has merely 600 HP but hits surprisingly harder than Blue devil.
Don’t forget to visit the sage in the northwest island. He promised to give you an ancient item, when you first visited him, but only after you slay all the escaped Demon King subordinates. All three escaped demon king subordinates are dead now, so go collect. The Proof of justice is the item without you can’t enter the final stage of the game.
Summary so far:
- All three devils are slain,
- you have collected 2 pieces of the hero set (Albama tower, Colma tower)
- both keys are in your pocket?
Congratulations! The easy part is behind you. Go to the Demon island on top of the map. You need the cell key to enter.
By now, you should be all around level 25-27. Take your time to grind for money and buy diamond weapons and armor to everyone not in possession of hero equipment. You can reach level 30 with around 90-100 groups of mobs if you like grinding.
By reaching level 31 with Alice you will get the heal-all spell. This spell will make you able to kill White devil in 6-7 turns. The easiest anti-devil tactics:
1. Guile hits, Rick casts Bless barrier, Alice casts Magic barrier.
2. Guile hits, Rick High Tension on self, Alice High Tension on Guile.
3. Guile hits, Rick hits, Alice mass heals.
4. Repeat steps 1-3 until White Devil is dead or you need to recast blessings and HTs.
15k XP and some gold. The road to Hero sword is open now, so go grab it from the chest.
The same tactic is valid for Black devil too, but when I killed him, we were levels 35-37, and all heroes were equipped with latest possible armors.
The last level is the demon dungeon. There are two important things there. Hero armor and miracle dress. The dungeon is vast and you need to find everything to stand a chance against the Lamia. After obtaining hero armor don’t forget to go to St. Louis castle to get the miracle armor from the sage. You have all 4 hero items now so he will stand aside and let you open the chest.
End game fight.
Lamia is reachable by using “the right hand” rule for dungeon exploring and the monsters before the Demon king (or queen) are not so hard. Most of them have breath attacks but never the less – give good gold and high XP. Feel free to train and explore, open all chests, collect money and goods. Don’t be hasty killing the Lamia before you reach levels around 40.
Lamia takes 10 turns to beat. Use the same tactics mentioned for devil fights. Every time Lamia will hit you twice like the other devils/demons. Mass Heal often and use both barriers, until Lamia goes OFF.
When Lamia is dead is time for the secret/hidden dungeon. It is not needed to do it, the game ends when Lamia is down. Your father will congratulate you and so on, but 🙂 … you will never get to 100% item collection this way 😛
A small detour to Colma town for the secret bonus level and the Dagger of Light and Excalibur after you reach level 40 if you feel brave, the cave mouth is open now. Go and enter. The dagger of light is easy. 3-4 battles until you go to the chest. Give it to Alice. The monsters hit very hard. Tigers do 60-90 damage and skull dragons and hydras breathe for 40+ damage often.
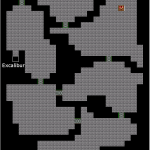
Excalibur is in the leftmost “room” that has a small single square in south. Go to that single square and advance another step south. Click/Search. There is the Excalibur. (for some reason the English Walkthrough forum claims, the Excalibur is in the Aluminum cave – No. It is not there)
The best ingame monster is here. Quetzalcoatl. He hits harder than Lamia an has 5k HP. Beware. However, if you simply want to finish the game, Lamia is easier and you can kill him/her around level 40. Quetzalcoatl will respawn for killing again after you kill him. If you try to kill Quetzalcoatl at level 40, you will probably fail. If you don’t have both bless and magic barrier + Curtain, he hits for about 150-200 and breathes 80-100 fire and cold, the funny part is 😉 … YOU CAN GET BACK AFTER THIS TO KILL HIM. AGAIN 😀
The area is also not suitable for grinding. If you want cheap XP and some money – hunt bells instead. There will be plenty outside the dungeon. Just cast “Amor” to skip all the small tier monsters. The silver bells will come in groups of 1 to 5, sometimes with gold bells.
Grinding for 10 minutes on silver bells and having a bit of luck to Critical hit them, will give about 50-60k experience. And that is about 1-2 levels. The best place for silver bells is the forest east of Colma Tower.
The level cap is 99, but you will learn all spells at level 40, so it’s up to you when you will finish the game. Lamia is killable with level 40 chars. Quetzalcoatl is very hard at this level, so you better not hurry. He is a bonus monster after all.
Also, after level 50 – every level Up will give you half of the HP/SP raise and half of the STR/SPEED/DEF, so It’s pointless to cap your heroes if you can finish everything before this. The good part in this is – Alice will start to level alot faster and will get enough life to survive the fight with Quetzalcoatl. And Quetzalcoatl is fun to kill. I’ve capped all my chars to level 99 for this.
The right tactics is the same as in the devils and Lamia.
- Guile attacks.
- Rick casts Bless barrier.
- Alice casts Magic barrier.
- Guile attacks.
- Rick casts high tension on Guile.
- Alice casts high tension on Rick.
- Guile and Rick attack.
- Alice casts Giga heal to the most injured one.
- Repeat until bless and magic barriers are off and recast them.
- Never leave a hero below 250 HP.
- If both Alice and Rick are low on HP – skip a round of attacking with Guile and heal them.
- Always have Bless barrier on.
- Always recast High tension on Guile.
- Don’t use Heal All. It’s pointless. Quetzalcoatl does more than 100 HP damage in 1 round.
- Optionally, if everyone is alive and well – cast Curtain. It halves Quetzalcoatl hits.
- Quetzalcoatl can cast Quake 8 times, but it does less damage than breath.
My personal record is killing him in turn 13. All my chars were level 99 and Guile made 4 critical hits with HT totaling 500-650 per hit.
That’s actually all you need. See some quick hints for 100% item collection below:
To complete all 5 gems:
- Red Gem – Colma Cave
- Green Gem – Enter rivermouth east of Port town and follow it to a solitary island. The different swamp square holds the gem.
- Blue Gem – Center of the map, one square island, barely visible on map.
- Black Gem – Albama tower.
- White Gem – Empty cell in Howard castle. Needs cell key.
All four hero items:
- Hero Helm: Albama tower
- Hero Shield: Colma tower (needs cell key)
- Hero Armor: Demon King Dungeon (west of Demon town)
- Hero sword: Demon Island dungeon (east of Demon town)
The 2 keys:
- Gold key is in River’s dungeon above Kata town, entrance is from river mouth near Colma town (see my Gailardia map)
- Cell key is in the soldier near the broken bridge north of Elisa town, but first you need to speak with Hagil near Elisa town (see my Gailardia map)
The 4 Miracle leaves are all in dungeon chests. The only really hidden one is in a strange grass-surrounded-by-forest square northeast of Colma town. Reachable also by boat from Port town
Excalibur and Dagger of Light are in the Hidden/Secret dungeon. One in a chest and one in a hidden black square in the west “room”.
If you liked this game, go and buy Gailardia 2 from the market to support the authors or try something else. Maybe you will be interested in the next game I’ve started after Gailardia. It’s “Quest!: Swords and spells“. Not that good as Gailardia but filled the time in the SubWay, until I get to work. Another VERY good game I am currently still playing is Demon Hunter. Started a small Walkthrough and charted the maps for the game. It is still far from complete though. If you can’t afford to buy the 2-nd Gailardia, give Demon Hunter a try.
| Spell name | Spell Description | Guile | Rick | Alice |
|---|---|---|---|---|
| Mini Heal | Restore about 30HP to an ally | √ | √ | √ |
| Heal | Restore about 100HP to an ally | √ | √ | √ |
| Giga Heal | Restore full HP to an ally | √ | √ | √ |
| Heal All | Restore about 100HP to all allies | √ | √ | |
| Revive | Brings one dead ally back to life with 1HP | √ | √ | √ |
| Revive All | Brings one dead ally back to life with full HP | √ | √ | |
| Teleport | Warp to a previously visited city | √ | √ | |
| Escape | Transport out of a dungeon or tower | √ | ||
| Amor | Avoid battles with weaker monsters on the field and sea | √ | ||
| Amor All | Avoid battles with weaker monsters in all location | √ | ||
| Mini Fire | Inflict fire damage to 1 enemy | √ | ||
| Fire | Inflict medium fire damage to 1 enemy | √ | ||
| Giga Fire | Inflict heavy fire damage to 1 enemy | √ | ||
| Mini Blizzard | Inflict cold damage to a group of enemies | √ | ||
| Blizzard | Inflict medium cold damage to a group of enemies | √ | ||
| Giga Blizzard | Inflict heavy cold damage to a group of enemies | √ | √ | |
| Mini Quake | Inflict earth damage to all enemies | √ | √ | |
| Quake | Inflict heavy earth damage to all enemies | √ | ||
| Ultima | With powerful concentration, deal heavy damage to all enemies | √ | ||
| High Tension | Temporarily doubles the attack power of one ally | √ | √ | |
| Mini Curtain | Temporarily increases the defense of one ally | √ | ||
| Curtain | Temporarily increases the defense of all allies | √ | √ | |
| Bless Barrier | Temporarily reduces fire and cold damage taken to all allies | √ | √ | |
| Magic Barrier | Temporarily reduces all magical damage taken to all allies | √ | √ |
