Small Home Network
Let’s assume, you have one real IP address given by your ISP and half dozen computers (like me, hehe 😉 )
You can hold all you machines behind a Linux box equipped with 2 networks cards. The box is capable of translating your local network addresses and to mask them behind your real IP address. This process is called Network Address Translation (NAT) and Masquerading.
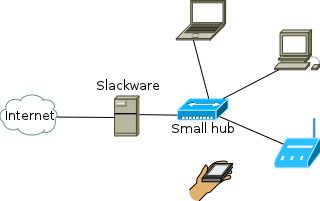
To setup a small home network as the one in the diagram in left, you need some tools. All of them are built in Slackware if you made full installation.
If you are not, you will have to put them manually. All of them are placed in category N of your Slackware installation disk or FTP, but you probably already have them. Check if you have the following commands: ifconfig and iptables.
bash-4.1# which ifconfig
/sbin/ifconfig
bash-4.1# which iptables
/usr/sbin/iptables
bash-4.1#
Everything you need can be done with them. It’s not hard at all. You need to set the real IP address to eth1 and an address from a private network to eth0. It looks like this:
root@router:~# ifconfig eth1 55.66.77.88/24 up
root@router:~# ifconfig eth0 172.16.1.1/24 up
root@router:~# ifconfig
eth0      Link encap:Ethernet  HWaddr 00:14:C2:C8:F7:2D
          inet addr:172.16.1.1  Bcast:172.16.1.255  Mask:255.255.255.0
...
eth1      Link encap:Ethernet  HWaddr 00:30:84:0A:6B:5C
          inet addr:55.66.77.88  Bcast:55.66.77.255  Mask:255.255.255.0
...
The address shown in red here is of course … fake. Use your own real IP address on eth1. You may set the local PCs on your network to use addresses of the range 172.16.1.2 to 172.16.1.254 with default gateway 172.16.1.1 and the same DNS settings your ISP has given you. If you don’t know what they are, have a look in the file /etc/resolv.conf or in your Windows control panel under Network settings (or use ipconfig /all from Windows cmd). Check from your other computers if you can ping 172.16.1.1. If this is okay, we move forward to the masquerading itself.
root@router:~# iptables -t nat -P PREROUTING ACCEPT
root@router:~# iptables -t nat -P OUTPUT ACCEPT
root@router:~# iptables -t nat -P POSTROUTING ACCEPT
root@router:~# iptables -t nat -F
root@router:~# iptables -t nat -A POSTROUTING -o eth1 -j MASQUERADE
root@router:~# echo 1 > /proc/sys/net/ipv4/ip_forward
...
root@router:~# ssh root@172.16.1.13
password:
root@Desktop:~# ping www.google.com
PING www.l.google.com (209.85.149.104) 56(84) bytes of data.
64 bytes from ber01s02-in-f104.1e100.net (209.85.149.104): icmp_req=1 ttl=56 time=50.6 ms
64 bytes from ber01s02-in-f104.1e100.net (209.85.149.104): icmp_req=2 ttl=56 time=51.2 ms
64 bytes from ber01s02-in-f104.1e100.net (209.85.149.104): icmp_req=3 ttl=56 time=50.7 ms
64 bytes from ber01s02-in-f104.1e100.net (209.85.149.104): icmp_req=4 ttl=56 time=51.1 ms
^C
--- www.l.google.com ping statistics ---
4 packets transmitted, 4 received, 0% packet loss, time 3003ms
rtt min/avg/max/mdev = 50.656/50.967/51.268/0.309 ms
root@Desktop:~#
The above explained. We create an IP table named “nat” to accept pre/post routing and output rules. Flush the table. Set the postrouting to use as output interface eth1 and masquerade all IP addresses as the real IP on this interface. Then set the dynamic Kernel parameter for IP forwarding to true and login to one of the local machines in this network we created to check if it worked. That’s it. Job is done. Of course, you need to set everything to go up in boot time, if this is to be made the right way. First set the Ethernet cards in /etc/rc.d/rc.inet1.conf to point those addresses:
IPADDR[0]="172.16.1.1"
NETMASK[0]="255.255.255.0"

# Config information for eth1:
IPADDR[1]="55.66.77.88"
NETMASK[1]="255.255.255.0"

# Default gateway IP address:
GATEWAY="55.66.77.1"
Change the red address to your real default gateway IP given by your ISP. The other thing we need is all those IP tables to be executed in run time. Either make additional script or just add them last to the rc.local.
root@router:/etc# echo -e "\n# Start networking" >> /etc/rc.local
root@router:/etc# cat >> rc.local
echo "Starting masquerade ..."
iptables -t nat -P PREROUTING ACCEPT
iptables -t nat -P OUTPUT ACCEPT
iptables -t nat -P POSTROUTING ACCEPT
iptables -t nat -F
iptables -t nat -A POSTROUTING -o eth1 -j MASQUERADE
echo 1 > /proc/sys/net/ipv4/ip_forward
This will do the job on every startup.
 So regardless what are the packages file name extensions in the installation disc – they will all go installed or upgraded.

