May 102012
 

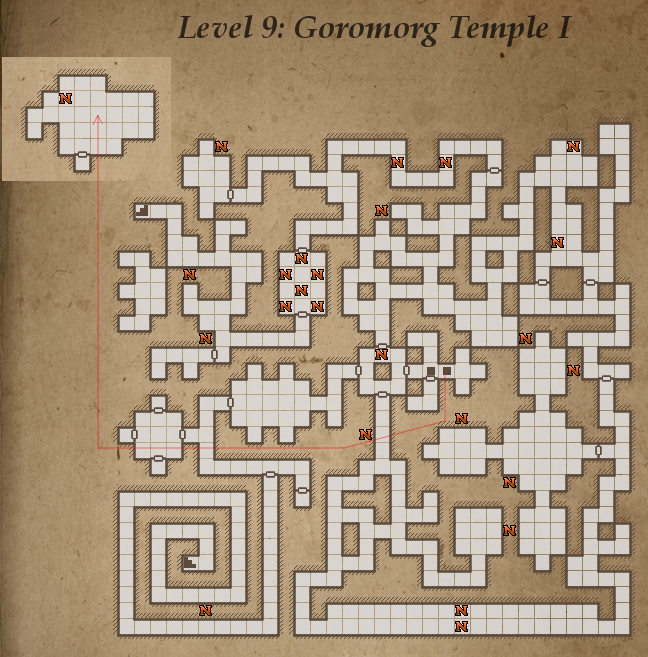
Level 9 map: Goromorg temple I for Legend of Grimrock

Level 8 was not hard at all. Even the ogres couldn’t spoil the fun.

This level begins with a sign claiming it’s a “Temple” and some fire elementals.

The long tapestries on the walls can be cut with a sword and often have something behind. In the first area after the entrance you will find hidden:

  • Button opening the “Scriptures” area.
  • Alcove with food.

Scriptures.

Fire elemental holding the Ornate key.

Alcove with a scroll about a vow from the order of fire protecting the Undying one.

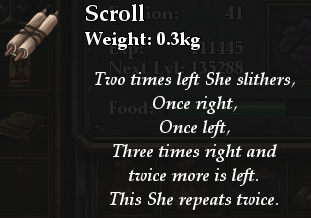
Another alcove with much more useful scroll:

Two times left she slithers...

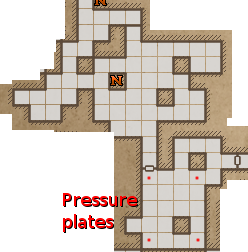
Checkered room.

This are has 12 pressure plates and few tapestries. Behind one of the tapestries is an alcove with a scroll:

“This is the Checkered Room.
Don’t let it fool you.”

Actually both possible checkerboards which you can do in this room will open the portcullis. But only one of them is useable.

The corridors after the checkered room leads to the Armory (west) and Temple grounds.


There are two reverting squares in the corridors towards the temple. You will find them by the disappearing iron ring on the wall when you step on them. It’s almost like there is a glitch in the game and the texture fails to display but is actually well designed trick to fool you if you don’t use map often.

They rotate you 180 degrees and you get back where you came from.

To pass them – just step back and step forward again.

Armory.

The armory is guarded by a fire elemental.

There are some arrows, lightning bomb, longsword, ring mail and iron basinet.

You already have better stuff, so just collect what you can use.

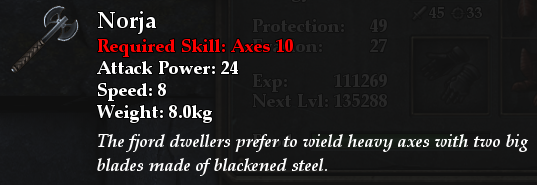
Break the crates. Behind one of them you will find a button opening a small room with a fire elemental and the Norja:

Norja in legend of Grimrock

Excellent weapon if you are focused on axes.

Temple grounds

This area starts with a warning. Cool. More fights.

There is a generator of Ice Lizards, which will come for a fight in random number. They are not very strong but they are very sturdy, so prepare for long fights. Lizards give 675 experience and occasional Ice lizard steak (food). Ice lizard steak fills you completely, so stash them somewhere when done.

Explore the area and when you kill around 15 of them, they will drop the golden key.

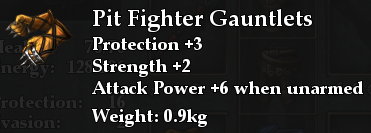
A button opens a secret room in the northwest area with pit-fighter gauntlets:

Pit Fighter Gauntlets

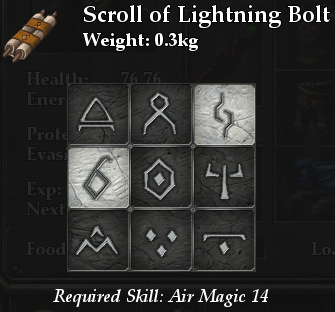
There is a lever which opens a blast door with the Lightning bolt scroll:

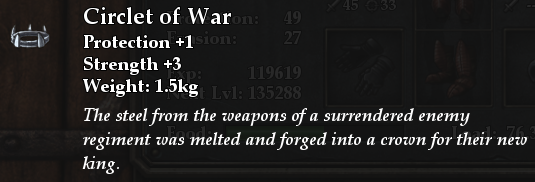
North of the regenerator, you will find a circlet of war:

Behind the regenerator room, there is area which can be closed with portcullis, so you isolate the Ice Lizards. Yo may go there to make your next stand.

Outer Sanctum.

Needs the ornate key from the Scriptures room.

As soon as you enter the room, the door will shut and 3 fire elementals will come. Try Fire shield if you have it – to minimize damage (16-th level fire spell).

[There is a button in the center area, which opens the way back out.]

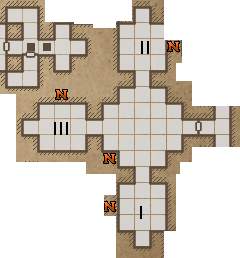
The area is divided in 3 parts, each one has inscription and teleporter.


“Hands that slaughter, Eyes that deceive.”
“Three ancient beings of deep.”
“Sun of hatred.”

A scroll will emerge in the feet of the central statue after you unsuccessfully enter any 3 of the portals. It says:

“III – II – I – III”

Now let’s get back to the inscriptions:

  1. Sun of Hatred (One sun).
  2. Hands that slaughter, Eyes that deceive. (Two hands)
  3. Three ancient beings of deep. (Three beings).

This means, the order is: West-North-South-West.

This leads you to the next area, with some trap doors, shooting heads and teleporter back.

Drop something on the floor, so the plate remains pressed.

Don’t go towards the heads – poison cloud.

Drop something behind the portcullis, so the pressure plate opens it.

On both sides of the trap door will be levers – pressing both opens small room with alcove containing another Ornate key.

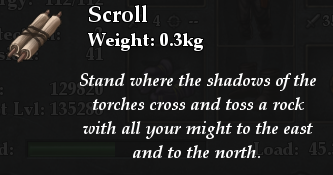
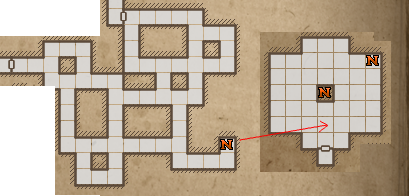
The trap door leads to a room on level 10 with 3 empty torch stands, teleporter back and small secret room. You need 3 torches and 2 rocks to open it:

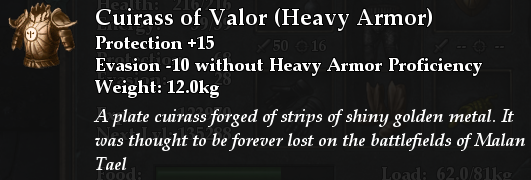
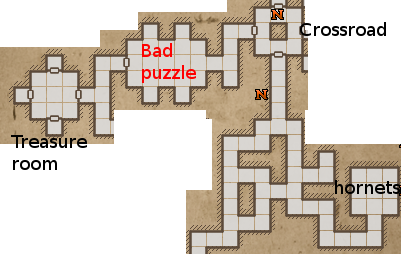
Cast darkness just to be sure (I marked the torches’ “cross” with N on the main map). (According to Chris – you may also use Throwing stars instead of rocks and it also works.) The reward is the “Cuirass of Valor“:

Pillared hallway.

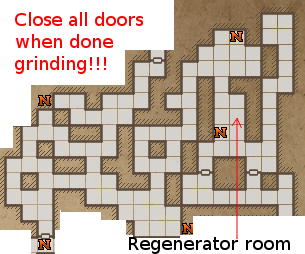
There are invisible teleporters, take you back from where you started and the hallway looks endless. See the map. This is where the clue “Two times left she slithers …” comes into account.
I’ve drawn a map for you, if you can’t figure it out yet:

Pillared Hallway

If you don’t do it right – you get back to where you start.

A fire elemental will come to greet you for your success reaching next area.

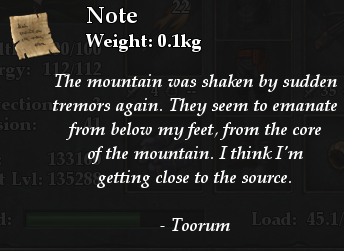
There are some corridors. In one of them you will find another Toorum note pressed by a rock:

One room has 2 hornets and some tapestries for slashing. Behind one of the tapestries is the Lurker hood. The hornets can disease you, so be vigilant.

Corridors end with a blast door opened by a hidden button (west wall, 2 squares before door).

In an alcove, you will find another free level-up:

Taking the book opens the four side walls, so you need to take it (who wouldn’t?). This allows you to get faster to past areas and opens another way west.

The way west is the blue stone and one…

Extremely nasty cryptic puzzle 🙁

There are 4 inscriptions and 4 alcoves. The inscriptions say:

  • “Tear of the Land”
  • “Game’s bane with head of steel”
  • “Unraveller of Mysteries”
  • “Severed Dread”

You need to place items in the alcoves, according to the short puzzle inscription. If you manage to guess the item, the alcove says :Click:

It took me some head scratching. I was a step away to run to the forums screaming and cursing. The easiest 2 to guess are…

  • “Tear of the Land” – is ordinary rock. There is one on this level, pressing another Toorum note (look above). Not hard to guess – but it was still a fluke.
  • “Severed Dread” – is a skull. The verb “severed” is used for body parts. (Still quite hard if English is not your native language and there are no other hints.) Let’s hope you have a minotaur Head Hunter with you and you collect skulls. Otherwise, the best place to look is in the end of level 7 in an alcove, just before the main exit to level 8.

Now the two others, much harder:

  • “Game’s bane with head of steel” – An arrow ;( … I actually tried all helmets and got 2 levels above to collect few more from places I’ve stashed useless junk. Then I’ve tried watching the GAME opening video and staring at the GAME’s logo to spot SOMETHING that is the BANE of the GAME and has steel HEAD… Then I remembered, that GAME also translates as something TO HUNT, such as deers, boars and so … and they are hunted with arrows. (Bolts will also “click” if you don’t have arrows).
  • “Unraveller of Mysteries” – turned out to be a key. But I also tried the compas, most of the Toorum scrolls and some things that were not logical at all. Then I’ve surrendered and read the game forum. Obviously the two loose keys were here on purpose. There were no any more doors to open on this level and … CLICK! Both gold or ornate key will fit.

After the door opens – you may collect all your stuff back. No need to abandon good arrow or +3 Minotaur Head hunter attack from a skull.

After the exit is an alcove with scroll praising your awe … you don’t say.

There are few more easier areas left.

The treasury.

3 gold key doors and only one gold key again.

  • North room has second Flarefeather hat and second Serpent bracer. You already have such items if you followed this guide.
  • West room has plate greaves and 2 frost bombs. IMHO – totally useless.
  • South room has ANOTHER book of Infinite wisdom.

Puzzle room

“Made from the dead
Guillotined Man
does not need me.”

The answer is Bone amulet. There are 2 in the upper levels, so go collect if you dropped them. (First bone amulet is on level 2 – room “Enter thy grave”. Don’t remember where I’ve found the second.)

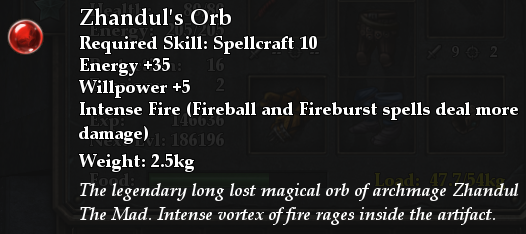
The reward is Zhandul’s orb. Quite good for mages:

Zhandul's orb

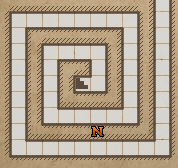
Next area is opened by ornate key you took from one of the puzzles. (You don’t abandon it in the alcove in the previous puzzle – yes?) The area is a spiral going clockwise:

One long corridor south, then long corridor west. In the middle of the second corridor is a button. It opens the door back to the start. There are 2 ogres in those corridors. And when you get attacked a wall will barrage your way back. So, in case you need to return to the blue healing stone for revive – be sure to find the hidden button.

In the end of the spiral is the way to level 10. Good job. Time for Goromorg temple II.
 Posted by at 12:43 am
May 062012
 
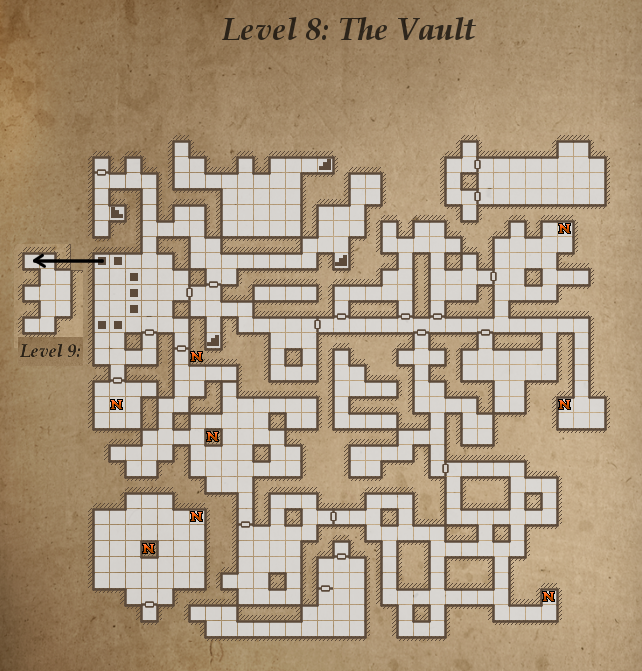
Map for Level 8: The vault - Legend of Grimrock

Map for Level 8: The vault - Legend of Grimrock

Level 7 has 2 entrances to level 8.

Main and secret.

Main Entrance will lead to a small area. Clean it first.

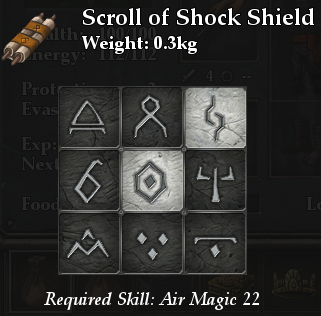
First room has alcove with Shock shield scroll  and cave nettle:

Shock Shield spell in Legend of Grimrock

The wall behind the nettle has a secret button opening a room with some food and a spider.

Further east is the blue healing stone and some portcullis.

Eastern end of this area has an Iron door needing Gear Key and the way to level 9: Goromorg Temple I.

I don’t think you have to go to the next level yet, so let’s explore this one.

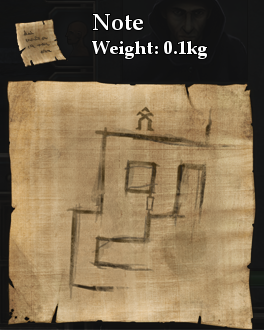
Behind one of the portcullis, you can take a note with quickly drawn map for a rune-button. Grab it, so you can find the place on level 7 which helps you get deeper in level 8. (A secret, I’ve already shown in the previous walkthrough article):

Vault of the Dismantler

This area has entrance from level 7 and level 8, but It can only be unlocked from inside, so we return to level 7.

Find the rune button with the map – Enter from level 7 secret passage and open the portcullis, so you have access to the blue healing stone.

There is a room with traps and lightning shooters to the west (and apparently – immortal spider). Ignore it for now. Go east.

Kill the Ogre and fire elemental if you haven’t already. There is a button there and a room marked as …

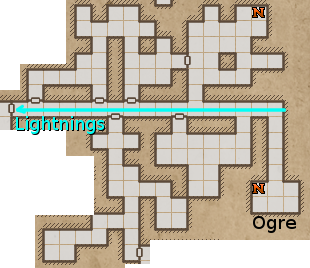
Lightning Conduit.

Lightning Conduit

Open and step aside. There will be some lightnings coming your way, so you need to time your entering well.

Don’t rush advancing too much, you are not supposed to take all the lightning hits. Advance smart.

[Even if you have level 22 air magic for the shield spell – you only receive 50% protection.]

A side corridor can be opened and used for this purpose. Just dispose of the fire elemental there.

Collect and pull the lever. It opens a door, so you can advance a bit deeper in the corridor.

Advance a bit east. Pull the chain and enter.

There is a button on the wall, which opens a room with pressure plate.

Press it with something.

Clean the adjacent room from the spiders and elemental. Use the buttons to open 2 more rooms with pressure plates and drop something over.

When all 3 are pressed, a room will open with some plate boots and gloves.

Pull the lever and an area south of the corridor with some elementals will open. You may wait for the lightning corridor to kill them or rush in to help a bit – up to you. There are 3 of them and a spider.

Secret button and lever in the room. The button opens a secret door deeper in the corridor – almost to the alcove. There is also a button in the corridor nearby, which opens another secret room … guarded by and ogre.

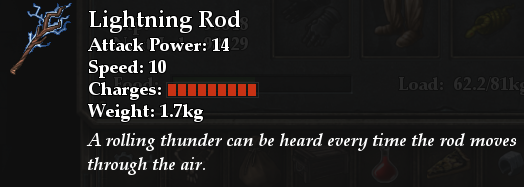
The ogre guards the Gear key and a lightning Rod:

Lightning Rod

[You may take some time to go back to collect the stuff behind the Iron door. It is opened by the gear key. It opens a secret room with the Helmet of Valor and a quarrel of few frost bolts. And there will be 2 heavy fights ahead.]

The lever opens the way to a room with wooden door in the center part of the corridor. Some spiders there.

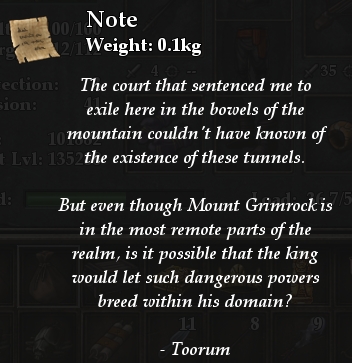
Alcove with throwing axes, alcove with frost arrows and another Toorum note:

(It is just a note this time 🙂 No cryptic secrets)

The portcullis to the south will provide some heavy ogre bashing, but no good place for kiting so rest well before the fight.

There are 2 ogres and 4 elementals total:

Grimrock - Ogres, elementals and mushrooms.

Try to use the corridors in your advantage and use as much ice as you can afford if you get cornered.

There will be some stuff lying around – 2x lightning bombs, few tar beads, some food.

There is also a door needing the Brass key and a teleporter to an area with some poison mushrooms.

I am sorry to say – Very deadly fight.

Even fighter’s challenge is not that bad, because it does not involve poison.

Either kite them or try to stand your ground with Poison shield. (Level 13 Earth spell).

Take the 2 poison cloud mushrooms first. They hurt the most.

Theн take down the 4 (2×2) rapid shooter mushrooms.

Leave the slow mushrooms for desert.

There are two tricks I’ve proven to work.


Trick 1:

Take the Serpent Bracer on your most strong character and cast Poison shield.

For a while, he will be invincible and no poison will harm him/her. Try to cast as many mass spells and shoot your arsenal while kiting. Probably all 3 chars except the bearer of the serpent bracer will die.

Take the 2 brass keys, collect the herbs (and the hatchets, if you need them). Bring your corpses to the blue stone and revive them.

You will not gain some experience but – what the heck – room cleared.

Trick 2:

First brass key is to exit this mushroom infested hole, and you are not obliged to stand and fight if you don’t want to.

Run and let them follow. Grab any of the 2 keys (marked on the map) and go unlock the portcullis.

Cast some heavy damage spells and run away through the portal.

Rest. Re-Enter and repeat. It is a bit cowardly but it works just fine.

Loot everything you like and take the second brass key.

It is time for the next area:

The second brass key is for the door I’ve mentioned above.

The corridors behind that door have 4 pressure plates. You need to drop some objects to activate them. (If you are short on items – go collect the useless throwing axes or the 2 ogre hammers)

4 spiders and fire elemental will come to bite and burn you. And a lever will reveal itself in the place which spawned them.

The lever opens another area west, which has more fire elementals and occasional spider.

(The area also has some throwing stars lying around, 2 alcoves with food and useless knife and helm.)

2 hidden buttons. Both opening a secret with empty chest guarded by an elemental.

In general – very lame area, but it opens the way to the room with the spider, trap doors and lightning bolts …


Lonely Spider hunt. 😀

You need to kill the spider, because he presses the pressure plates which activate the lightning bolt heads shooting.

The trap doors lead to a room on level 9 with some snail (food) and few throwing axes.

Pull the lever to open the way to the main part of the level (and the blue healing stone).

There are 2 hidden buttons on the north and east walls (where the map-note was). They open a portcullis to the south.

Behind the portcullis is a lever which will allow you to collect the stuff you used to kill the spider and a room claiming it is the vault and you are supposed to Beware 🙂

Find the hidden button which opens the secret room for the next treasure (Dragon figurine (5/7))

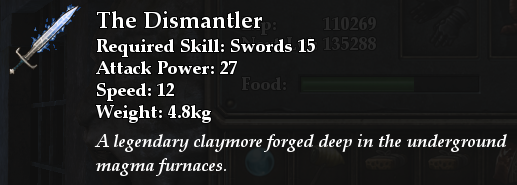
Place a sword on the marble and get the big one. If you try to grab it and immediately replace it with another sword. You will still suffer at least one lightning blast.

The dismantler is one very good sword, if you prefer using swords on your fighters:

The Dismantler

The Dismantler

This concludes everything you may do here. Proceed to level 9: Goromorg Temple I.

 Posted by at 10:45 am
May 042012
 

After you visit Port town, you will understand you need to battle another monster, or they will not help you with the blueprints.

The monster is in the cave Southeast from Port town.

Southern cave.

Southern cave is 2 level cave with 2 things important:

  • Level 1 has a chest with a work permit accessible from level 2.
  • Level 2 has a miniboss.

There are some Goliath spiders who will paralyze you, so grab some paralweed.

The Red Snake has approximately 500 HP and hits 2 times for 20-25 damage. Fire and Ice spells often miss, so stick with thunders.

Heal a lot while fighting. Never leave a char with less than 30 HP for more than 1 turn.

Should not be a problem beating it with level 15 party.

Go back to Port and get the blueprints.

Go back to Calandora …

and give them to the shipbuilder.

The other guard asks you about a world map and explains it is suicide to not have one if you go to the seas …

You need to wait a bit until the ship is ready anyways, so go for the map.

The map is in Colma town, exactly at the shop for travelers in the center of the city as you already suspect.

The price is 2000 gold.

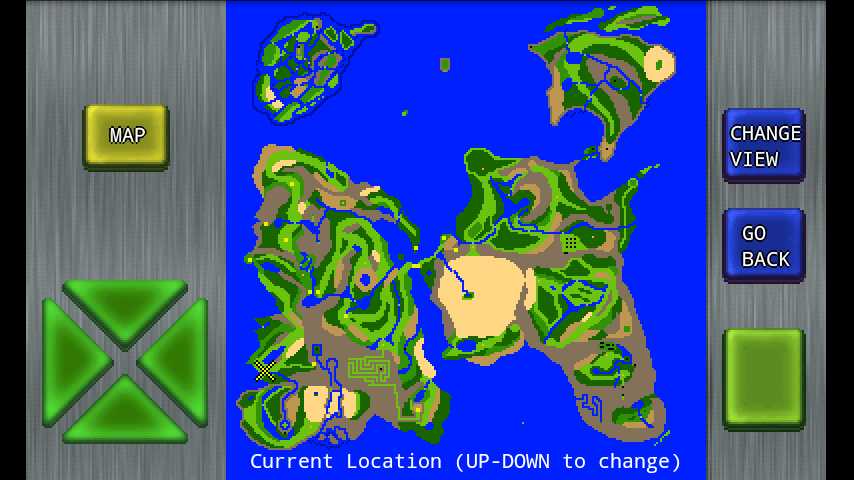
It shows all places you already visited as blinking dots and your position as large “X”. Using the arrows will cycle the X over the villages you visited and will show you their names below:

Gailardia 3 map of the world

Gailardia 3 map of the world

Now go back to Calandora and get the ship.

Free sailor 😉

Explore the sea

Explore the sea

This is where the linear part of the game ends.

You may head anywhere.

You don’t need to stick to the scenario written below, but use it as a guide only.

The nearest place to go is the island in the river mouth near Calandora.

The sea monsters are bearable, just beware the turtles. They hit with 25+ damage.

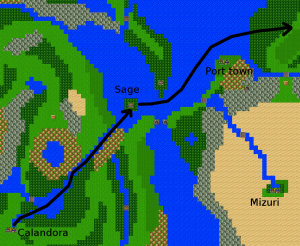
The sage found in  the shrine on this island suggests you start on the northern bank of the eastern continent (this means Port town and beyond).


So you better head that way.

There is another small shrine with a shop and church you can use as base. It is NE from Port town but you need the ship to reach it.

Shrine of peace.

The shops sell Magic armor for 3000 gold, so you need to collect some money to invest in all chars which can wear it.

There are also scented charms and spider silk sold there.

There is a treasure inside but you need the find gold key first.

The sage in the “Shrine of peace” points to the town of Mystia about the gold key.

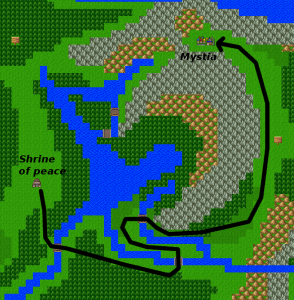
Mystia is Northeast of this shrine, but the way is with a long detour and yellow slimes sometimes cast mini blizzard.

You will probably reach level 16 with your party at this point and your monk will learn “Revive!”. (Mages will have it too at level 18). This spell gives a bit more confidence when exploring. Even if someone falls – you may revive and heal.

The ways to Mystia are 2. Both have monster parties which breathe and cast spells. Arm with patience and try as many times as you need.

The shorter way to Mystia is not north (there is only a sign explaining it is a detour – and it is really a long detour).

Go east instead. Some bridges, one sign and there you are:

Path to Mystia in Gailardia 3

Path to Mystia

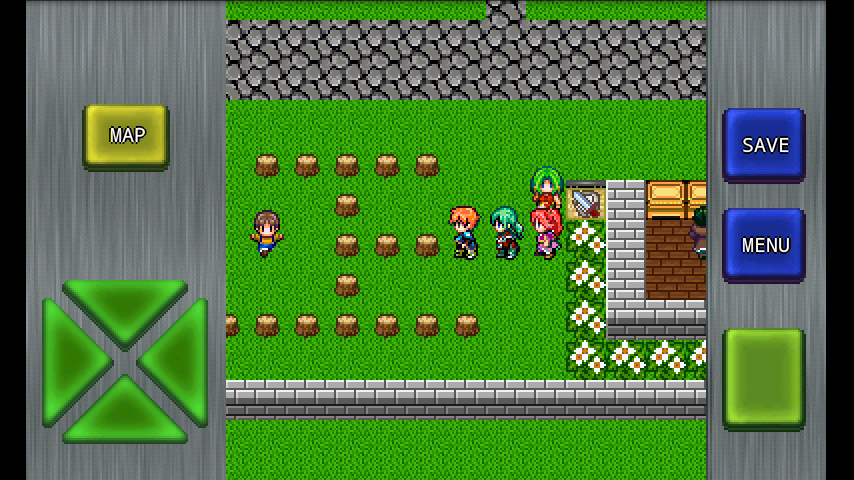
Mystia town.

Armor shop sells some better stuff:

  • Steel hammer – 3000 gold
  • Orc shield – 3000 gold
  • Magic robe – 3500 gold

Buy them, because fights will not become easier 😉

Traveler wings in a barrel above Inn.

Oyster pearl hidden in one tree trunk (see picture):

Oyster Pearl

Oyster Pearl is in this tree trunk

Local sage tells you about monsters being lured out with meat.

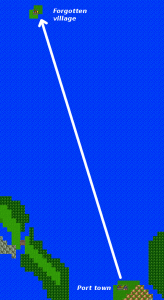
Path to Forgotten village in Gailardia 3

Path to Forgotten village

A Guard tells you not to fall in the well and another guard points you east towards the woods.

The third guard sums it all: Monster – woods – gold key.

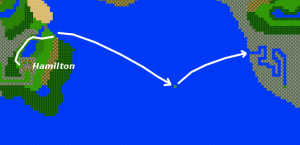
The female cook in the building behind him tells you about her friend in the Forgotten village having monster luring meat. The Forgotten village is in solitude island in the ocean. If you teleport to Port town and go north-northeast with the boat, you can’t miss it (see picture).

Not hard to reach, there are some Manta ray, crabs and hermit crabs. The only bad monster is again shellfish (paralyze).

Forgotten village.

  • There is scented charm in one of the shelves in the inn.
  • Shops sells the same stuff as Mystia.
  • Sage points you to a nearby tower to hunt Rex-monsters (This can wait)
  • The meat is in the northeast corner of the village. Speak with the boy and you can have it.

Return to Mystia.

Go to the area east of Mystia. There is one area with clearing. Enter it and follow the right-hand rule.

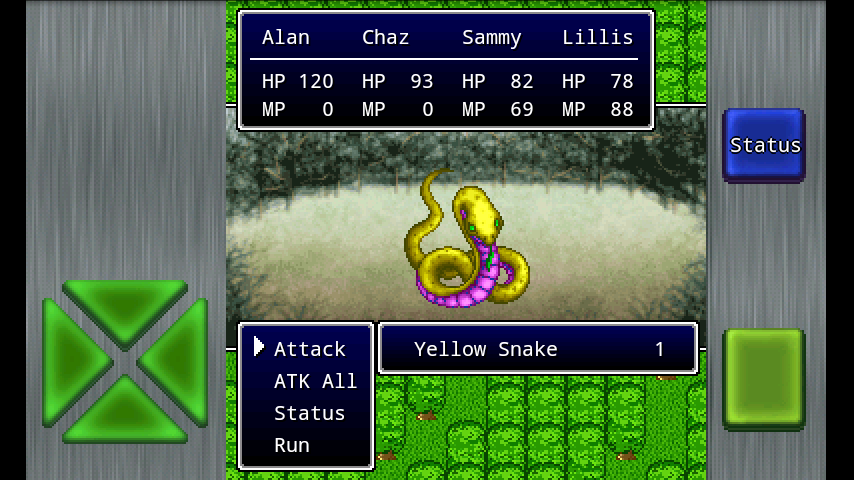
Boss monster is called Yellow snake and is in one clearing 3×3 squares wide. If you don’t have the meat in your bag – monster does not show itself.

The Yellow snake has MiniQuake spell and hits for 20-30 damage 2 times per turn.

Yellow Snake miniboss in Gailardia

Yellow Snake miniboss

Level 18 party will get wiped easily. You risk this fight or train a bit – it’s up to you. Tactics are simple and you already know them from gailardia 1:

You need to cast High tension on warrior and samurai and keep healing with your monk. Cast some offensive spells with the mage but always have high tension on fighters.

When complete, you get the gold key, 6000 xp and 400 gold. Quite worth the battle.

Now let’s go back to all places with gold doors 😉

  1. Castle Raiton, king’s bedroom. (work permit, scented charm)
  2. Castle Hamilton, in front of guard keeping aluminum ore (work permit, traveler wings, 1200 gold)
  3. Castle Hamilton, second floor to the west. (High job ranking specialist, but you don’t have advanced work permit yet.)
  4. Shrine of peace. (800 gold and a work permit).

After you complete the gold key quest, yellow gem can be bought for 5000 gold, from the adventurer trader in Colma town. (2/7)

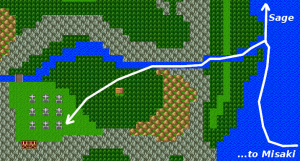
You may want to visit Misuri, the desert town.

Get the boat east from Port town in the river mouth.

Stop on the bridge and head South.

South only.

Have a look at your map. It’s the only oasis in the big desert. Can’t miss it.

Luckily you will encounter only one or two groups of monsters.

Mizuri, the desert town.

It is a great place for establishing a training and grinding camp. You will need around 50000 gold to buy all new equipment sold in the shop. The monsters are dangerous but generous, so you can spend 30 minutes in the area around city. Only the cactus can cast spells and not any single one of them has any breath or spell attacks 😉 Perfect for training.

Book shelves in the Inn tell you to find a bomb to blow a boulder. (this is done later). There are also Traveler wings in one of the wardrobes.

People explain, that …

  1. There is a desert tower Southeast from Mizuri with strong monsters.
  2. There is a village with the knowledge to build a bomb. Somewhere. (read below)

You can easily train in the desert until levels 25-26 and collect enough money to upgrade your party in the Mizuri armory.

For quick results – Set the game speed and text speed to MAX and enable combat spell casting. Train until you spend all SP and return to rest. You will be fully equipped and levels 26 in no time.

If you happen to reach the east end of the desert, a sage shrine will appear and explain why and how you will be lost in the desert if you don’t have an item for orientation. If you try to advance east, you will return back.

On The Other Hand, the tower southeast of Mizuri only needs the gold key.

You only need to fear Super Mages and large groups of ghosts. Mages heal and use Blizzard, doing 25+ damage to everyone in your party. Ghosts breathe cold for 10-15 damage.

  • Left (west) staircase of tower floor 1 leads to 2 chests with Miracle leaf and 1200 gold.
  • Right (east) staircase leads to the boss and a room which can be opened with cell key only (mark this place for later).

Fighting Rex gives 7500 XP, 1000 gold and a green horn.

Use Curtain and cast high tension on the fighters. You are quite strong already, so don’t stop hitting and healing until Rex dies.

Because the east desert cannot be crossed yet,

Return to the sea.

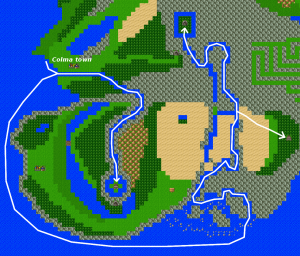
Another sage’s shrine can be reached if you follow the river from Colma town. The sage explains Cell key is nearby.

Get back to Colma and proceed south by boat. You need to go all the way around to the delta of the river and enter.

There will be another sage in a shrine to the east of the river bank. Accessible by gold key only.

The sage gives you a secret letter and his guard tells you – everything will be alright if you blow the boulder.

The letter is for the bomb, and without the letter – you can’t have it. The bomb is needed to blow a passage east to the Kata town.

While you are still here – Proceed north with the ship.

The river’s source is a cave. Embark and enter. Use the right hand rule.

There are 3 things here:

  • Miracle leaf,
  • Black gem (3/7)
  • and a button on level 2 of the cave – press it… distant rumbling is heard…

… and then go back to Colma. If you remember – there was a closed part of the tunnel in the cave, with inscription to come here after the button is pressed.

Back to Silver key cave.

Go east from Colma and descend deeply into the cave.

Remember the black squares? This is where we need to go now.

Advanced work permit in a chest. Your first one.

Another easy loot, Go to Misaki village with teleport spell, man the boat and sail west (world is round):

You can enter the hero grave through the river.

Black pearl and Ring of power (+10 attack) inside the chests.

While still nearby – visit the sage at the Northeast corner of East continent.

He will tell you Rex monsters keep important things away from humans.

His guard tells you to run from dragons.

This sage is all-dull-and-trivial, but there is Inn inside, so you may rest a bit.

There is another place west of this shrine (on an island), which can be opened by cell key. The passage leads to the Northeast continent with Howard castle inside. But you can’t go there yet. Just enter it to mark it on your map.

North, above this continent there is important sage shrine above it on one of the bigger islands.

He tells you to “Light” them in the order Green, Red, Blue. And you will know what he means when the time comes. (It refers to the horns you collect from miniboss fights).

Small island 1 square wide.

Teleport to Hamilton castle and get in the boat.

Head East-SouthEast.

Search it and you will find another Work permit.

Keep east after the small island until you reach the east continent. In the end of the water labyrinth, on the only grass square is the white pearl. Just land and search.

Try also the secret shrine in the river near Raiton castle. (the blue gem is also nearby (4/7)).

The sage in the shrine tells you Lamia, the demon king is in the southern mountains  in the eastern continent and the guard tells you to find the cell key because the  loot inside the room is great. (mark this whole place for later).

Another Rex.

Teleport to Forgotten village and go NorthEast to the Rex island. (see world map).

The tower has two entrances.

One normal with a useless chest on level 2.

One hidden with a boss monster on level 3.

If you quit dungeons with “Escape” – you may never find the Rex monster.

Loot the normal part and go to the exit by foot.

Step outside – you will not be transported outside the tower immediately…

Head west by the outer wall of the tower. There is another entrance 10 squares west:

Second Entrance for Rex tower.

Second Entrance for Rex tower.

Go to floor 3.

  • High tension on fighters. Curtain and Bless barrier are a must.
  • Hit him with fighter while healing with mages.
  • 1000 hit points will be over in 3-4 turns if you are lucky to score 1-2 critical hits.

Red Rex gives red horn, 5000 xp and 800 gold.

This concludes everything loose, that could be done as side quest around the seas for now. Let’s go get that bomb for the Cell key.

Now let’s have a look at this archipelago continent at Northwest:

Archipelago in Gailardia 3

City of water.

Start from Raiton castle and go North by boat.

There is a way through the reef labyrinth, so you go almost straight there. Just take a detour by land to the topmost island. Walk on the bridges to the chest, there is a ring of protection inside.

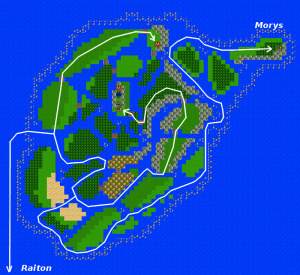
There will be a miracle leaf and old book in the inn. Reverence to Gailardia 1 heroes.

The local sage tells you there is town called Morys in the center of the small islands, where people are holding important secret.

Shops don’t sell anything new.

There is a North exit from the town, where you need to battle a monster.

White snake has about 1000 HP and gives 8500 xp and 800 gold. The treasure behind the snake is Advanced Work Permit. The second you find. Feel free to make two chars stronger (You need the gold key to enter Castle Hamilton’s trainer).

Get back in the water and follow the south reefs. The way to Morys is long and you need to get back almost to the beginning.

Morys.

There is a Celt dagger sold in the shop for your magic using characters. Only 6500 gold (you probably have 30k loose gold already).

If you followed so far and collected the secret letter from the sage – the guard will let you take the “secret” bomb (and useless 1800 gold).

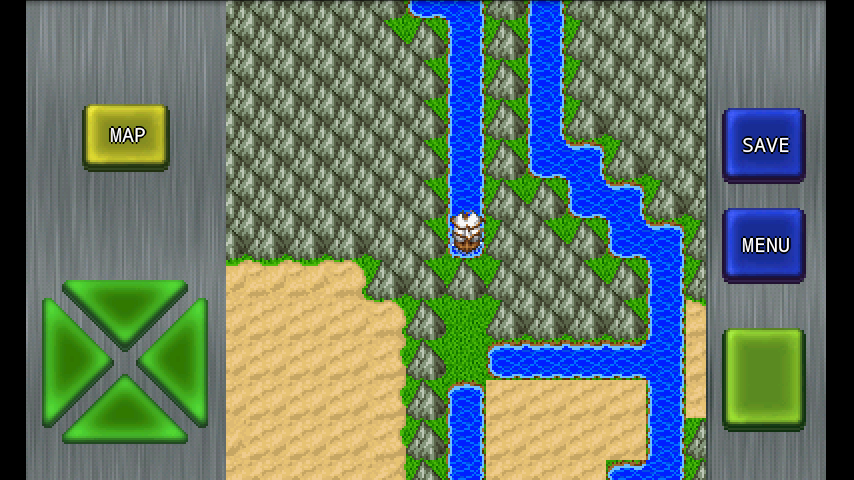
Teleport to Colma and go south and then east to the delta of the mountain river.

Advance and get in the side river. Place the bomb and the boulder is blown. (see the picture below):

Blow the boulder, to open the way to Kata town.

Blow the boulder, to open the way to Kata town.

The river will extend flooding small part of the desert, so you can land there now.

Advance east to the town of Kata. The monsters are easy for level 25-30 party.

But I will continue this walkthrough in part III, because it grew above 2000 words.

 Posted by at 11:58 pm