May 022012
 
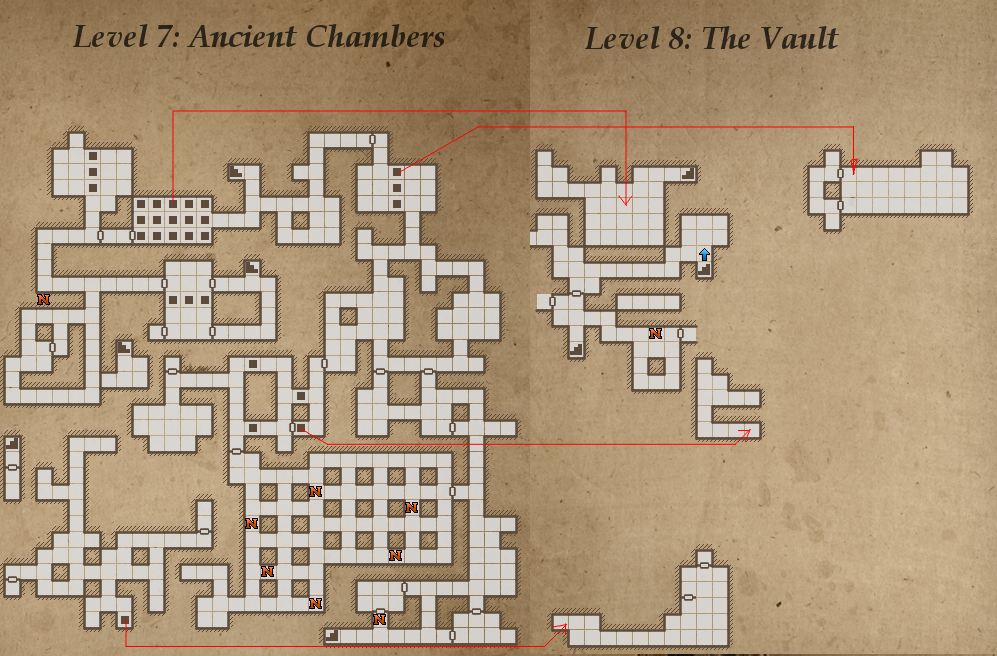
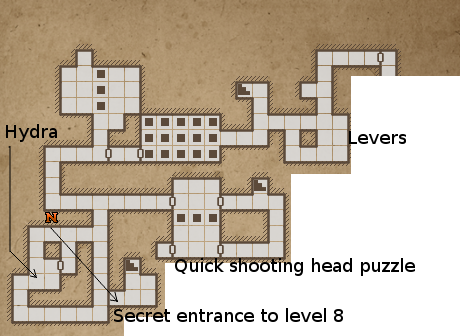
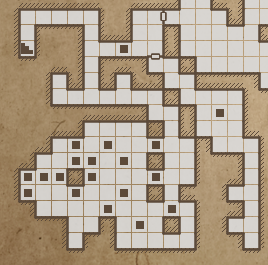
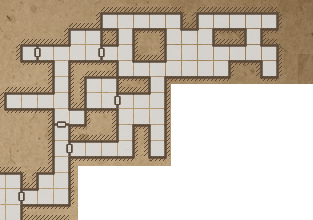
Legend of Grimrock, level 7 map.

Legend of Grimrock, level 7 map.

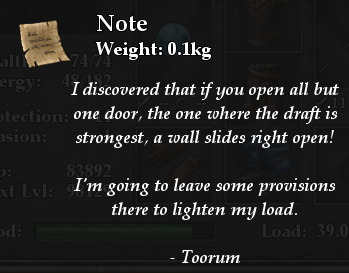
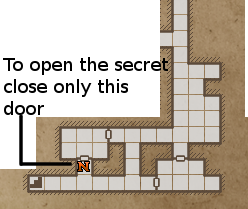
Toorum Note regarding wall and draft

Toorum Note regarding wall and draft

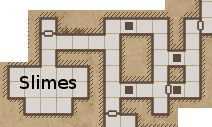
Cleared level 6? Let’s kill some slimes then πŸ˜‰

You will start level 7 in a corridor with closed blast doors, which are opened with buttons.

Slimes are not hard if you kite them. Just move backwards half second before it launches it bile and shoot or cast a spell. Then advance and use weapons.

There will be half-dozen of them – freely lurking around in the beginning of the level.

The first room in the corridor has 1 mushroom and a tar bead. Open both its doors to use for kiting slimes if they give you hard time. It’s going to be much easier.

Room 2 has two slimes inside already. Deal with them, move the tattered cloak away to find the Toorum note.

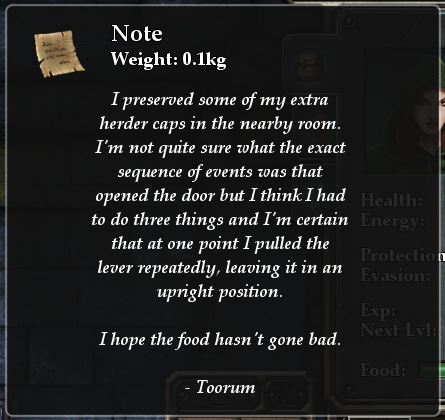
Again – Quite cryptic one, but it’s only 4 combinations, and you could have figured it out by yourself:

After you figured it out, get on to the next area:

Maze of Shadows.

Maze Of Shadows

It is not hard, you will figure it out quickly. There are 5 torches in the maze, and you can’t drop shadows.

If you go near a torch, you may drop a shadow. That’s the main idea.

You will find a HardStone bracelet, Darkness spell and another Toorum note about Torches.

There will be two slime bells *(a herb) lying around too.

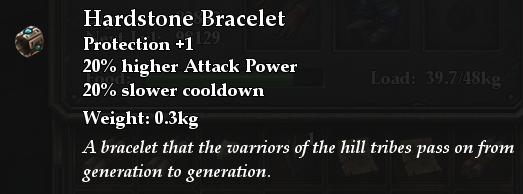
Hardstone bracelet gives more attack power for the trade of speed (you hit harder but slower):

HardStone Bracelet


Darkness spell dozes light so you can see where the torches are dropping shadows and find your way around (or just check the minimap above). If the light on the floor is dim – you may probably pass through. If it is bright – don’t.

If you drop shadow, you will be transported back to the beginning of the area.

Take your time in the maze.

In the south part of the maze, you will find huge box with food. On the east wall where the box is – you will find a button which opens a corridor with teleporter and few bombs behind it.

Enter the teleporter, kill the 2 poison mushrooms and loot. (bolts, mole jerky and throwing axes).

Find the rune button inside the secret room and press it. You will get to the frost bombs on the other side of the teleporter and get the 4 bombs. They are usefull (frost bombs).

Enter next area.

Kill the fire elemental. Drop on level 8 secret room from the pit. You will find bracelet of Tirin (good one for archer, you shoot 15% faster):

(The second pit leads to the same room on level 8, but there is nothing. Just teleport back.)

Next, there is a room with a pressure plate.

Save before pressing it. You will release some slimes and they can surround you quickly.

Get back fast. Try to get in the corridor with slimes in front of you and nothing behind you.

You may consider going back to the door and closing it. Then take your stand and take them down one-by-one.

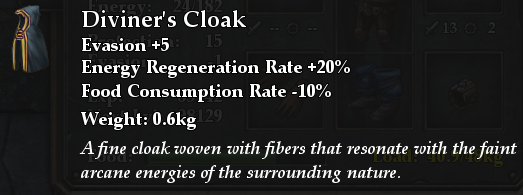
When done with them – get back to collect the iron key, some bug-food and the Diviner’s cloak in the slime room:

When you use the key and advance east, there will be 3 more elemental for brutal slaughter.

Take them down.

[After you advance in this area, your next sleep will be visited by Toorum again. He explains about a machine, which is not guarded and you will use it to break from this dungeon. Just a little further.]

There will be one button near the wall with the socket. Click it and get back so it’s hit by the head, (the portcullis will open) then go back to the button, so you don’t stand in the way of the other head. If you do it right, the pit will also close.

If you don’t like slimes – You will not like the next area πŸ˜‰ There are half-dozen of them and they will want a piece of you.

Deal with them.

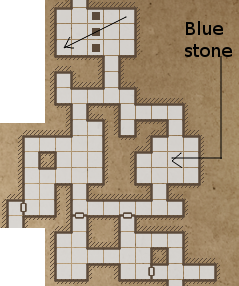
The Blue stone is here, some herbs, Fire Torc (+50 fire resistance amulet):

There are 2 rooms with a small puzzle and 4 fire elementals.

The puzzle is simple.

  • Step on the left plate to open the portcullis completely.
  • Step on the other plate, so the head fires light bolt …
  • … and immediately go back to the left plate which opens the portcullis.
  • This way the portcullis stays open for the light bolt to pass and all secret doors will fall.

One of the doors has 4 elementals, and the other has some good stuff:

  1. Another Toorum note.
  2. Scroll of invisibility.
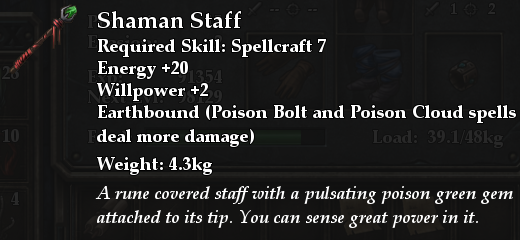
  3. Shaman staff:

In the north room of this area, there are 3 pits and teleporters.

Falling down again.

This room is a bit annoying.

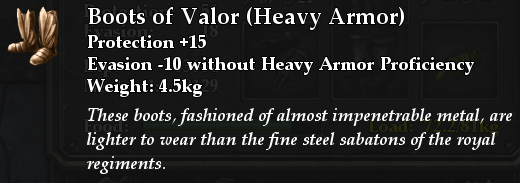
Needs some strafing to get away from the poison bolts, but in the end, you will walk with the Boots of Valor (+15 protection):

Pulling the lever will release some Crabs and spiders, but there is one trick – Use the pressure plates to launch poison bolts towards the spiders and crabs.

It will not kill them, but they will come to you softened a lot and you can finish them.

The teleporter will transport you on the other side of the pits to the next area:

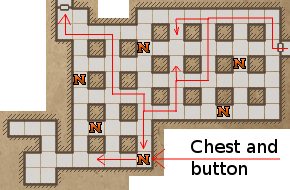
Next area has a corridor with 5 levers and a room with 15 trap doors and a head blowing bolts (every bolt inverts the trap doors’ positions – closed/open).

Levers.

At first – All levers are pointing up.

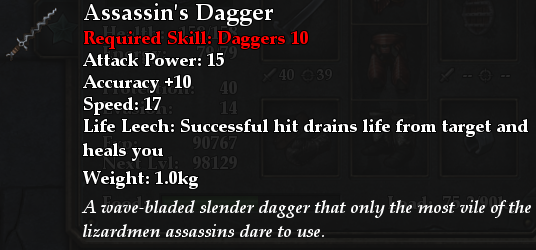
If you reposition them (from left to right) up-up-down-up-down, behind you will open a secret alcove with an excellent life leaching assassin’s dagger:

The trap doors room has 3 things:

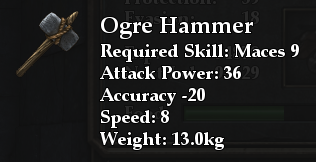
  1. The room below has an ogre, but this time you can easily kite him down – there are no spiders to stand in the way. He drops another hammer with low accuracy and there are also kite shield, a herb and an edible mushroom.
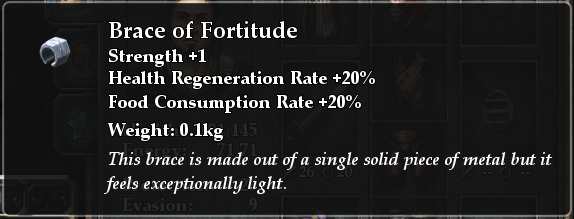
  2. There is an alcove in the northeast corner of the 15 trap doors room, with a “Brace of fortitude”. You probably already have better, but take it regardless.
  3. There is also a button in the Northwest corner of the room which opens the door to the next room. To reach it in time, you need to advance quickly in the room and stand in the way of the bolt, so the trap doors stay closed. The light bolt does not harm you – so you are okay to plan your steps from there.

If you fall down again, there will be a spider waiting for you. Not a biggie at your level.

When you open the door to the next room, 2 fire elementals will come to burn you.

Deal with them.

The west part of this area is with longer corridors (one of them has barely visible rune button).

There is one room with a hydra coming from the basement. Use Advance-hit-and-run tactic. In the alcove behind the hydra there is a -5 accuracy flail and probably a fire elemental will come too for additional chaos.

And lastly a room with 3 trap doors, 3 heads and 3 fire elementals.

Deal with the elementals and open the next room. The stairs to level 8 and an alcove with a skull (Take it if you have “head hunter” trait on your minotaur char).

Go around and you will see the receptacles where the 3 heads will shoot light bolts and an iron door behind them.

This puzzle is NOT EASY πŸ™‚

You need to stand in the way of the bolts.

It starts slow. But then it goes like a machine gun and takes some quick moves. The reward is scroll with an “Enchant Fire Arrow” and Chitin boots:

Enchanted bolts and arrows deal +5 more fire damage. Your mage needs 7 fire skill and to hold the quiver of arrows/bolts in the hand.

[There is a rune button which opens a secret room in the east corridor where the hydra was, but you need to run for it πŸ˜‰ – It opens another way to level 8. There is an ogre and a fire elemental which will stand in your way, while you try to kite the Ogre.]

But – That’s all you can do in this level for now. Go to level 8 from any of the 2 ways you prefer. The main or the secret.

 Posted by at 12:18 am
Apr 292012
 
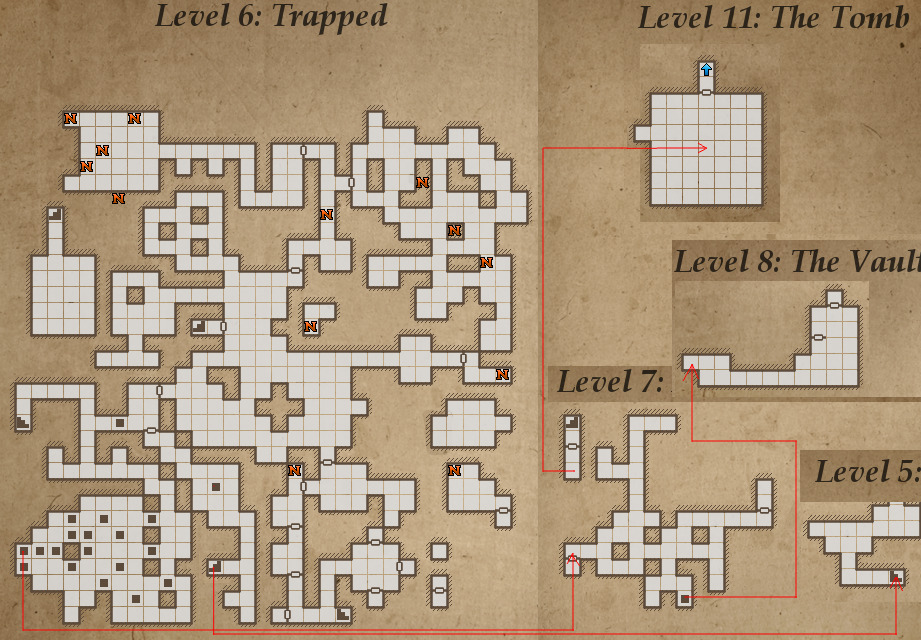
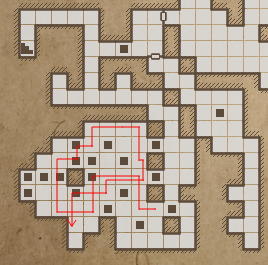
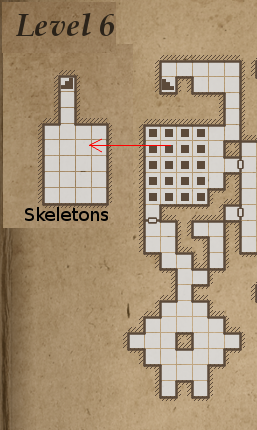
Legend of Grimrock, level 6 map.

Legend of Grimrock, level 6 map.

… I hope you came from level 5 in full health.

You start level 6 with bad fight on your hands.

There will be a bashing Ogre in the hall you will enter. Don’t let him corner you or you are toast.

And not just this but also 3 spiders will come to poison you and stand in your way, so you can’t kite the monster effectively.


Needs some good moves and lots of trial and error.

If you see him running towards you – quickly strafe on any side to avoid the charge attack.

It does very heavy damage.

If you manage to kite him down he gives:

  • 750 experience
  • Ogre hammer
  • A bag with food and a gold key which opens the treasure in the end of the level (but has another much clever use!!!)


Finish all the spiders, so they don’t stay in the way and have a good look at the main hall. There are some few areas, which you can cleanse in an order you like:

  1. Spider grotto.
  2. Walkabout.
  3. Sequencis.
  4. Halls of fire.
  5. Vault of the orb. (Secret).
  6. Haunted halls and Maze of madness.

Spider grotto.

There is a good sword in the alcove and a chunk of meat.

Few spiders for killing. I suggest you clean this room first, because it does not have door and you may see some loose spiders lurking in the main hall.

Walkabout.

There are 3 places in the area which make clicking sounds.

  • Start “walking about” clockwise in the path I’ve provided in the minimap above.
  • Keep walking.
  • Every few walks, something will appear.
  • First it is a stone.
  • Second a skeleton pikemen.
  • Third a (secret) bag with speed potion and its recipe.

Quite an easy area compared to the other ones. Just one skeleton to kill.

Sequencis.

This area is a bit tricky, but it opens the way to the blue stone, so I recommend taking this area ASAP, so you can use the stone.

Deal with the 2 crabs inside.

Go to the teleporter and enter.

You may need to observe the map.

There will be 4 places in which you will start to teleport quickly and will rotate between them endlessly until you exit the teleporter.

DON’T press the button or a poison cloud will be exhaled from the head.

One of the rooms has a door with a chain for opening.

Behind this door is a snail guarding a switch.

Kill the snail and enter.

Pull the switch and save!

Enter the teleport again.

The Northeast room will have an opened portcullis (by the lever).

There is another crab inside you need to kill and you will find the first round key.

When you return to the Sequencis, there will be another crab infestation in the main hall. Be prepared.

I suggest you open the door with the round key and make your stand there (you can get healing from the blue stone if you are low on health).

Clean the spiders and go to the other areas to collect more round keys.

Halls of fire.

Get the fire bomb and jump in the trap door.

The first trap door leads to next level and you have some flyers to take down.

Few herbs, sandals and a shirt. Some closed door you will open a bit later from the same area.

A scroll saying “WestMost” and another trap door leading even deeper to level 8.

Heal if you need and drop to level 8.

There are some herbs, food and a pressure plate which releases half-dozen bugs for killing.

Behind the bugs there is a small secret room with a good plate helm. +12 AC.

You need to depress the plate from inside the bug room to open the secret. Drop the item on the pressure plate from outside in such a manner which will allow you to take it from inside.

If the plate is not depressed, the secret room will not open.

Get back to level 6 when done with the above.

The room near the trap door has 3 crabs and another trap door which leads you behind the wooden door on next level. It is a secret and gives lurker pants and a throwing star.

After the spiders, in the corridor, there is a pressure plate which starts launching fire balls.

The 2 alcoves in the end of the corridor have The Fire sword but you will take heavy damage if you simply rush in.

A button on the west wall will open a small place for you to hide.

Another button exactly after the pressure plate will open another hiding place.


From the second place, you can hide until the fireball passes and quickly go and loot the 2 alcoves.

Edit: Also from the second place, you will spot a button on the north wall which opens a secret way up to level 5. Go there and collect after you are done with the fire sword. (There will be 2 fire elementals there, but the reward is good. Two plate items. Armor and gloves) Thanks to Orley Lima for pointing that out.

The sword is very important if you don’t have a mage with Fire skill 13. Without fireball, you can’t close the trap door in the beginning of the area (the one claiming this entrance is for Mages).

The sword shoots fireballs when you swing. And the fireball is the only way to close the trap door (you need to shoot fireball towards the head.)

If you don’t have or already spent the sword and can’t cast Fireball – you can’t go there – Halls of fire will be closed to you, but you can still continue the game (with less secrets completed though. Either – return later, when you can cast a fireball or abandon this area.

How to enter?

  1. Throw an item, so the head spews a fireball and step aside. (If you skip this – pressing the plate later will blow the fireball on you at point-blank).
  2. Cast fireball or swing the fire sword. The fireball will close the trap door (You didn’t forget to loot it first. Yes?)

North of the head is secret entrance to levels 7 and 11. A place named “Fighter’s challenge”. You still can’t enter it (Needs Vex sword), so leave it for later.

Go into the trap-door room and dispose of the two fire elementals. They are afraind of ice and poison and give 500 XP each, quite good for a monster which is falling fast.

The “Westmost” scroll is a bit cryptic, but it reveals another treasure:

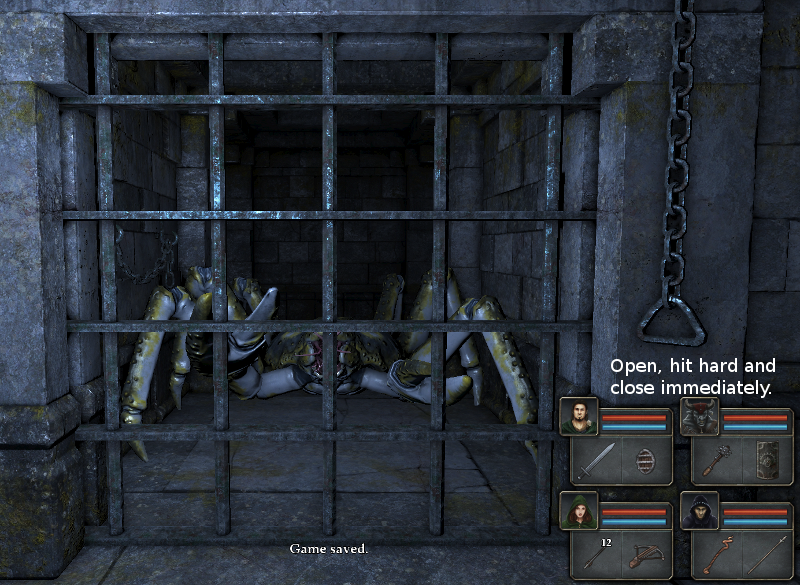
Go to the western part of the level and fall down in the westmost trapdoor. The “Golden grave”. There is a crab which will give you 10 seconds before the door opens.

Hit hard and grab the crown. (3/7 treasures). After you come back in the pit Hall of fire area, 2 more elementals will come.

Dispose of them and focus on the puzzle:

It takes quick moves.

  • At first, only one button in the room can be pressed. Press it and run to the column in the center.
  • Press the button, quickly go on the other (opposite) side of the column and press the other button.
  • Get the round key from the alcove. Once you grab it, another elemental will come. Either shoot itΒ  or use a spell.
  • REMOVE the torch from the stand and another trap door will close, allowing you to go around for the last button.

Now repeat the whole exercise again, but this time press all the buttons in this order:

  1. East
  2. West
  3. North
  4. South (see map).

Halls of fire Puzzle

Once done, behind you will open another secret room with another elemental.

He guards a ring mail armor and the Vex sword.

This sword is needed to open the Fighter’s challenge, so don’t throw it away if you don’t use swords in your fighter characters.

Fighter’s challenge

This battle is still a bit hard if you are merely level 10-11, so either risk it or leave it for later. (you will be surrounded by dozens of bugs)

There are 3 tricks you may use to hide, so you are not bitten from all 4 sides:

  • The golden key from the Ogre in the start of the level (if you have not used it yet). There is another golden key on the floor, but you can’t rush towards it fast enough.
  • The secret room in the Fighter’s challenge. (the button is on the west wall)
  • Or just try to quickly kill all the monsters until you advance to any corner.

All three of those are hard, and you will probably lose one of your chars, while trying to hide there.

So – If you decide to fight the Challenge:

  1. Be at least level 12, so you have better chance to survive.
  2. Before you start killing – Bash your way to any corner OR try to open the secret room with the 4-th treasure (4/7 – Ancient apparatus)Β  OR use the golden key and make your stand there. This way you will only need to fight 1 to 3 bugs at a time and your rear chars will take fewer or no hits.
  3. Use freezing bombs to stop attacks from any side that’s bugging you to death and focus on the other side.
  4. Cast as many mass damage spells as you can before your mage falls. Alas, this char always falls first.
  5. Mix some health potions before battle and have them handy so you don’t lose time finding them in the middle of the fight.
  6. Leave this battle for a time when you have (re)opened the way to levels 5 and 7 already, so you have access to the blue stones. This way if anyone dies – you can revive the char by using the blue stone before any other battles. (Yes, if at least one char survived – let him drag your bodies to the blue stone – and you are okay).

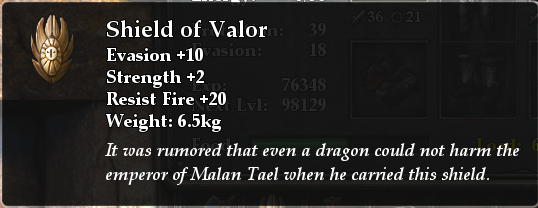
That’s all the advice I can share. I managed to kill them all with always at least one dead char, but the reward is worth it:

Shield of Valor

Shield of Valor

If you are still level 10, this battle is probably not for you. Read below and decide if you want to grind until levels 12-13 in the “Haunted halls” area.

Vault of the orb. (Secret).

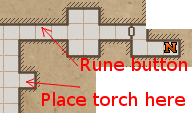
The secret room is opened by placing a torch in the main hall *(there is only one empty torch stand – can’t miss it).

There is a skeleton and grenade for taking (you need this for more damage in the fighters challenge).

Immediately in the same secret room with the grenade is a rune-button (north wall), which opens another room.

Step on the pressure plate.

You need something cheap and heavy (such as the shield of the skeleton you just killed) to press the plate behind the teleporter.

Place the shield in the teleporter (don’t throw, but exactly Place it).

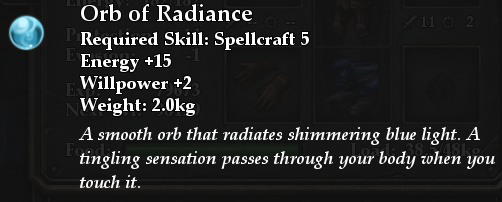
Enter and loot. The orb is very good for mages:

The bad part is … yes … you guessed – two more crabs. And the exit will be closed, so you can’t run to safety.

If you can’t kill two crabs – better leave this secret for later.

Ice bomb is the best choice if you get cornered or mobbed. But you better save it for the Fighter’s challenge.

When done – The same rune-button which opened the room opens the way out.

Haunted halls and Maze of madness.

Haunted halls and Maze of madness.

There are a half dozen of snails which you can kill for food.

When you get back near the entrance of the area, 2 of the snails will re-spawn.

Finally a room designed for food and xp πŸ˜‰ They only give 60 xp, but it sums fast with the 3 respawning skeletons in the Haunted halls.

Haunted Halls.

The other fun place. There will be 3 respawning skeletons for training.

Apart from the easy training, there is:

  • One Secret room triggered by a hidden button with 2 skeleton archers which guard a +50 cold resistance amulet.
  • Another secret room (again triggered by a hidden button) will have skeleton pikeman squad (x4) and some Heavy shield and ring boots.
  • Third secret room for which you need a patient skeleton to stand on the pressure plate until you run for the door πŸ˜€ A bit tricky but you will find a way to do it. Squad of skeleton pikemen, few herbs and Another round key.
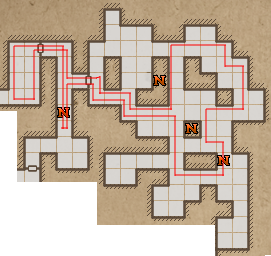
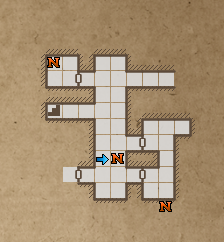
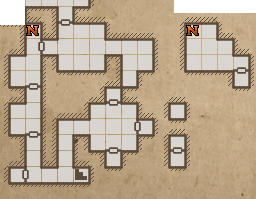
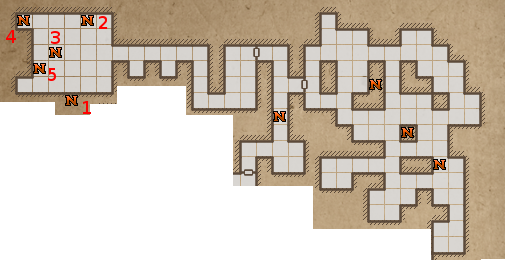
I’ve marked the 3 spots with “N”. Feel free to spend some quality time here bashing skeletons. They only give 90 XP but there will be 3 of them + 2 snails in the other room.

The full cycle is giving 390 experience points and takes 1-2 minutes to complete. (15 minutes = 3900 experience):

Legend of Grimrock - Grinding place in level 6.

Legend of Grimrock - Grinding place in level 6.

Maze of madness.

This is a bit tricky and there are 2 things here. Another round key and a +25% experience amulet.

To reach them, first you need to find the 2 buttons and press them. Have a look at the minimap above

First button is on the south wall (1) and clears the way to the key (4). If you don’t press this button, there is another teleporter in front of the key, and you can’t enter.

The second button is near the round key (north wall (4)) and clears the path to the amulet.

The teleports are not very tricky. It takes some trial and error – I’ve put the important ones on the map (see the “N” signs).

Treasure area.

Once you use the round keys to open the way down, the way back to level 5 will also reopen.

There are 4 round keys total.

The Fourth Round key is not mandatory to pass the level – It opens a secret room with Chitin Armor.

You only have one gold key, so choose wisely:

  1. Tome of fire: +3 Fire skill and +10% fire resistance.
  2. Crossbow.
  3. Herbs, flask and fire bomb.

[For me, it was a no-brainer. I love spells, so I’ve chosen the tome]

That’s all you can do here. Descend to level 7.

 Posted by at 1:29 pm
Apr 262012
 
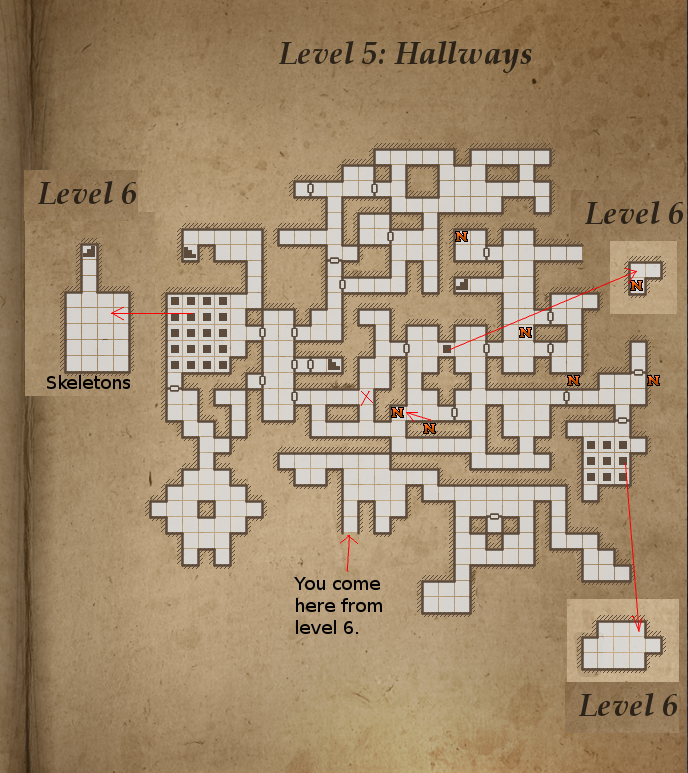
Legends of Grimrock level 5 map

Legends of Grimrock level 5 map

Level 5: Hallways

You start in a hall full of statues.

There is a light coming from the ceiling, so I suppose there is another secret room in level 4 from which you can fall here. (drop me a message if you know)

2 rooms have levers for opening and third room is accessible from there:

NW room has a scroll of fireshield and 2 bolts.

SE room has a loose brick which opens a wall. Inside the wall there is another button to open a secret room with good +8 evasion cloak.

Inside the 3-rd room is a chest with useful spell (Light). And few ingredients and food.

Having “Light” means – no more torches in hand for you πŸ˜‰ Also – no more searching for torches.


The iron key is in the 3-rd room also.

You can’t do anything for the cave in (fallen rocks), so open the SW portculis with the iron key.

There is a trapdoor to level 6 with another Toorum scroll :). He claims there is nothing in the room, but in fact, there is Toorum Scroll πŸ˜€ … Brain = blown πŸ˜‰

One of the rooms has 2 alcoves with food and the first Dragon statue. Take the rations.

One of the corridor has barrels and boxes. Nothing inside them.

Go east to find the pit room.

3 buttons control the trap doors.

You need to click them in order – South, Southeast, South, Northwest and then grab the key.

2 flyers will show up from hidden rooms and attack.

One of the flyers mass hits with electricity so kill it quickly.

Toorum note and a herb in the hidden rooms.

(Edit: Thanks to John) In the room below the trap doors. Near the teleporter back is a hidden button which opens a secret door. Fire and Lighning bombs there.

Beware the 2 flyers, one of them breathes lightning too.

The toorum note explains how to enter the room with the lever and 2 button. It is a bit tricky but you will manage (Click buttons in order Right, then Left and then pull the lever down and return up). Conjurer hat, some food and a helm:

Save.

Go to the door with iron lock and open it.

4 flyers. 2 lightning and 2 normal.

Take them down.

In the next room you will find useless +2 cloak and the blue stone.

The Crabs behind the portcullis are strong, so save again. Fight can suck if you try to bruteforce the crab. They fall better if you kite them around, but here – there is simply no space:

Open portcullis and hit hard. If you have some damage over time spell such as poison cloud. Cast it and close the portcullis. 450 experience per kill.

When both crabs are down, explore the next area.

You will find chain greaves (heavy armor).

Near the cave in is a secret room. You can open it from the corridor outside with a small loose brick. (the corridor before the Crab).

West room has a scroll behind the barrels saying

“The gate of iron shall open
if you take your time
and rest in the place
where the dragons gaze.”

You need to find both Dragon statues first, but if you need spoiler, have a look at the map in the beginning of the text. I’ve marked the spot with”X”.

From this hall – There are 2 areas: Chamber of pits and Deserted tunnels.

Chamber of pits.

Chamber Of Pits

Chamber Of Pits

Press the button and try to remember how the trap doors in front of you follow the path to the next corridor.

If you fall down, there will be some skeleton fight. 1 pikeman, 2 loose archers and a squad of 4 pikemen. The fight is not fight, but try to kite them around, so you don’t get hit a lot.

Some food and herbs as well as few ice arrows are laying around for taking.

Stairs back to level 5, another bow in the alcove and a lever to open you the way back to the pit room.

The right “Dance” above the pits is:

Press the button.

Start with your back facing the lever.

W-W-N-W-W-S-S-E-E-N-N-W-W-S-S-E-E-S-S-W-W-S

(west-west-north-west-west-etc.)

Have in mind, there is another crab there, so be careful.

Save.

Kill the crab,

Go inside the room and take the key.

Fight another crab, 2 poison mushrooms and one mushroom herder which pour out of the walls and the first ornate key is yours.

Drop something useless in the alcove where the key was, and the wall will open to allow you to go back.

There is another way back with button and lever.

Just reverse your advance back, using the same steps or simply fall down on level 6 and get shortcut.

Now is the time for the secret πŸ˜‰ :

W-W-N-W-W-(click!)-S-S-E-E-N-N-W-W-S-S-E-E-S-S-E and then turn around… the pit will stay closed.

Bracer of fortitude:

Not a miracle, but will help in the fight ;).

Click the loose brick on the south wall and the pits will make another closing cycle for you to get out (or simply fall down and get back).

Deserted tunnels.

You need to kill some monsters here.

There are a stone and a pressure plate in the first corridor.

There is also a lever.

Need to time your steps to enter in the tunnels.

The lever closes the porticullis, creates a teleport over the pressure plate and opens the wooden door.

If you drop the stone on the plate before this, it will be useless. (teleporter will remove it and depress the plate)

Click the lever, turn around and throw the stone to the pressure plate, turn back and run for the door. If you do it before the clicking ends – you are okay.

“There is not turning back” πŸ™‚ … uh-huh.

Poison mushroom for killing.

One room which can be used as a rest place with chain gauntlets and a herb. Use the chain to close it if you are in need of a rest or there is a crab on the other side. (2 total)

Advance a bit until you hear walls moving and run back to this room.

There will be a mushroom herder, crab and poison cloud mushroom released against you.

Keep exploring and you will find a warhammer (and another crab will be released). Kill the crab either with kiting or hide-and-hit behind the portcullis in the room

There will be another release of herder and poison mushroom near the room where you hide.

Keep killing until there are no more.

Go to the next room and take the second ornate key.

Once you take it, the corridors you were before this will be filled with skeleton pikemen and you need to fight some weaklings.

There is a secret room with a portcullis near the Dragon statue.

It is open by the same lever that opens the door (with clicking sounds).

Just run in the oposite direction this time.

Huntsman cloak, mushroom and fire arrows.

Open the way to level 6 and kill all the skeletons.

Open the iron door by resting in the place where the dragon statues gaze (no, not in fron of where they stand, but on the square of the map, where their gazes actually cross. Not hard to find out (see map, the spot is marked with “X”)).

When you sleep for 10 seconds on the spot, the Iron door will open.

There is lurker vest inside the secret room. Not very good, but without penalty so – it’s up to you if you want to keep it.

This concludes everything you can do on level 5 for now. Descend to level 6.

 Posted by at 8:23 am